
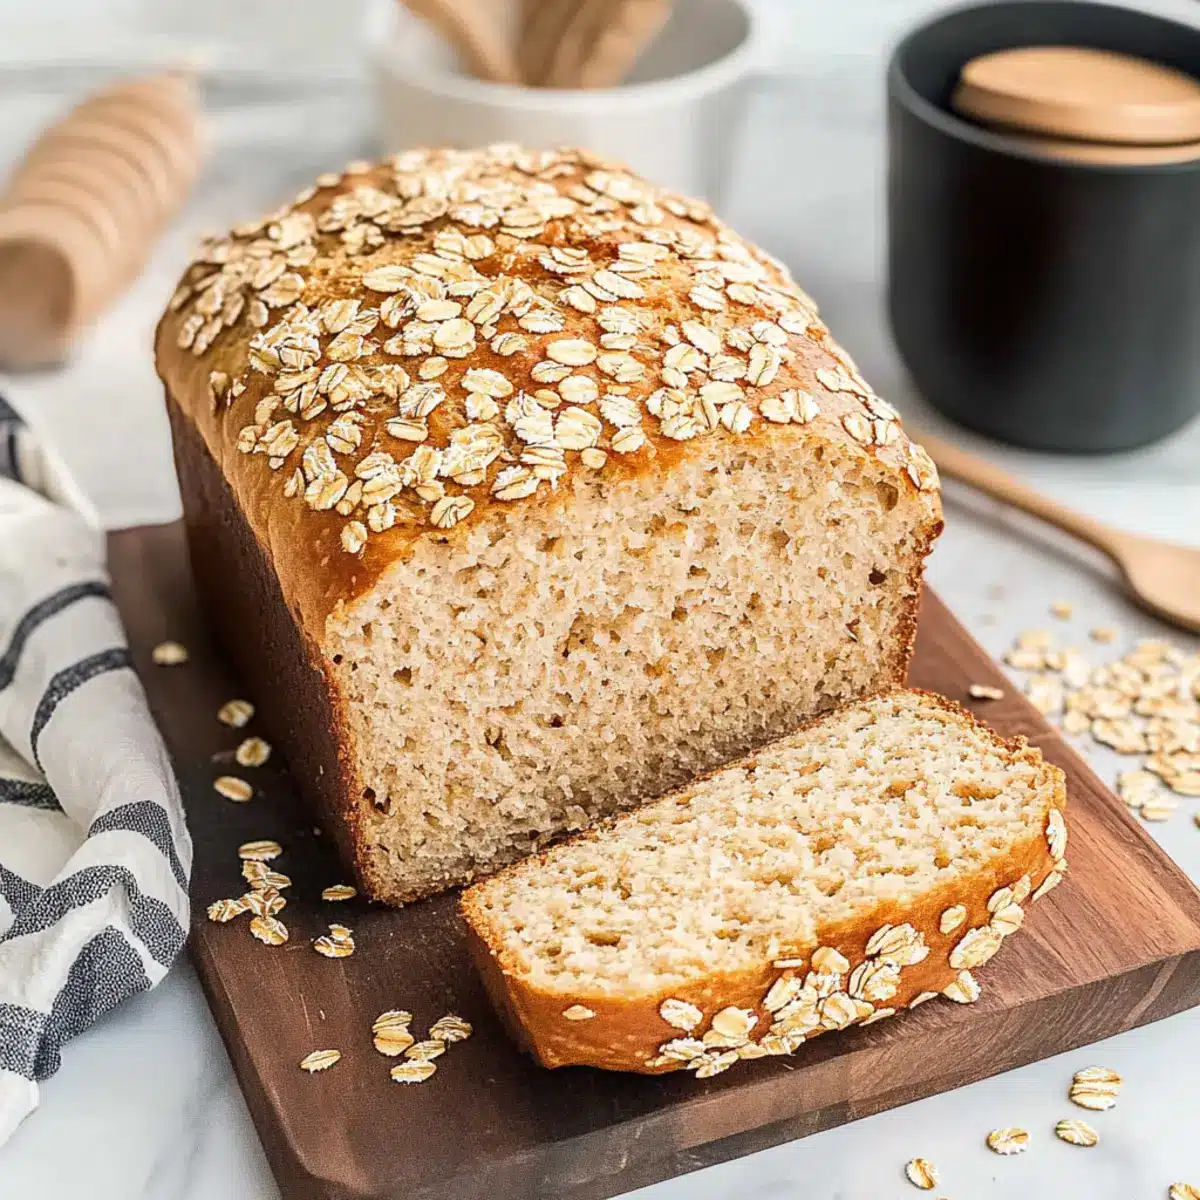
As I stood in my kitchen, the warm aroma of baking bread intertwined with the promise of a cozy evening ahead. This Honey Oat Bread, brimming with delectable sweetness and lightness, has easily become one of my favorite go-to recipes. Not only is it a wholesome, homemade delight free from processed sugars, but it’s also incredibly versatile—perfect for toasting, crafting hearty sandwiches, or enjoying simply on its own. The best part? It’s a breeze to whip up, making it an ideal choice for both beginner bakers and seasoned pros alike. Are you ready to fill your home with that irresistible scent and savor a slice of comforting goodness? Let’s dive into this delightful recipe together!

Why is Honey Oat Bread a Must-Try?
Homemade Goodness: This Honey Oat Bread is your ticket to enjoying a delightful loaf packed with natural sweetness and wholesome ingredients, all without any processed sugar.
Light and Fluffy: Thanks to the unique blend of rolled oats and all-purpose flour, this bread comes out fluffy with a tender crumb that will delight your taste buds.
Versatile Use: Whether you’re creating gourmet sandwiches or toasting a slice for breakfast, this bread does it all! Pair it with warm butter or your favorite spreads for a treat.
Satisfying Aroma: Imagine the enticing scent of freshly baked bread wafting through your home—it’s unbeatable! Baking your own bread elevates any occasion, making moments special.
Time-Saving Recipe: With simple instructions that yield impressive results, you’ll find this recipe is not only quick but also perfect for busy weeknight dinners or weekend brunches. Explore more ideas with our Sweet Harmony Honey or the delightful Chocolate Zucchini Bread!
Ingredients for Honey Oat Bread
• Get ready to bake some wholesome goodness!
For the Bread
- All-Purpose Flour – Provides structure and stability, but can be substituted with whole wheat for a denser loaf.
- Rolled Oats – Adds texture and a slight nuttiness; quick oats work as a suitable alternative.
- Active Dry Yeast – Essential for leavening and ensuring your bread rises nicely; make sure it’s fresh to avoid any issues.
- Salt – Enhances flavor and strengthens gluten; this ingredient is crucial, so no substitutions are recommended!
- Unsalted Butter – Adds richness and moisture, but feel free to swap it out for olive oil if you prefer a dairy-free option.
- Milk – Hydrates the dough while adding richness; whole milk is best, though almond or coconut milk can be used as substitutes.
- Lukewarm Water – Activates the yeast; use water around 110°F to ensure it works effectively.
- Honey – Naturally sweetens the bread and contributes to moisture; you can replace it with maple syrup if desired.
Enjoy baking your comforting Honey Oat Bread with these ingredients, and get ready for the delightful flavors to transform your kitchen!
Step‑by‑Step Instructions for Honey Oat Bread
Step 1: Prepare Dry Ingredients
In a large mixing bowl or stand mixer, combine 3 cups of all-purpose flour, 1 cup of rolled oats, 2 teaspoons of active dry yeast, and 1 teaspoon of salt. Mix these dry ingredients thoroughly with a whisk or spatula until well blended, ensuring the yeast is evenly distributed. This foundational step is essential for perfecting your Honey Oat Bread.
Step 2: Heat Liquid Ingredients
In a saucepan over medium heat, combine 1 cup of whole milk and 4 tablespoons of unsalted butter. Heat the mixture until the butter melts completely, but do not let it boil—keep an eye on it to create a harmonious blend. Once melted, stir in ¼ cup of honey and ¾ cup of lukewarm water (around 110°F) until everything is nicely mixed together.
Step 3: Combine Ingredients
Pour the warm milk mixture into the bowl of dry ingredients. Using a wooden spoon or dough hook, mix the ingredients until a shaggy dough forms. Pay attention to the texture; it should be slightly sticky but cohesive. Continue mixing until everything is well incorporated, ensuring your Honey Oat Bread dough comes together beautifully.
Step 4: Knead Dough
Transfer the dough to a floured surface or keep it in the mixer bowl, and begin kneading. If using your hands, knead for about 10 minutes, or 6-8 minutes if using a stand mixer, until the dough is smooth and elastic. If the dough feels too sticky, sprinkle in additional flour gradually until it reaches the desired consistency.
Step 5: First Rise
Place the kneaded dough into a lightly oiled bowl, turning it once to coat the surface. Cover the bowl with a clean kitchen towel and let it rise in a warm, draft-free area for about 30-60 minutes, or until the dough has doubled in size. This vital step helps develop the flavors and texture of your Honey Oat Bread.
Step 6: Shape Bread
Once the dough has risen, punch it down gently to release air bubbles. Transfer it onto a floured surface and shape it into a loaf, rolling the dough tightly. Place the shaped loaf into a greased 9×5 inch loaf pan. Cover it again with the towel and allow it to rise for another 30-60 minutes, until it has doubled in size and looks puffy and inviting.
Step 7: Preheat and Bake
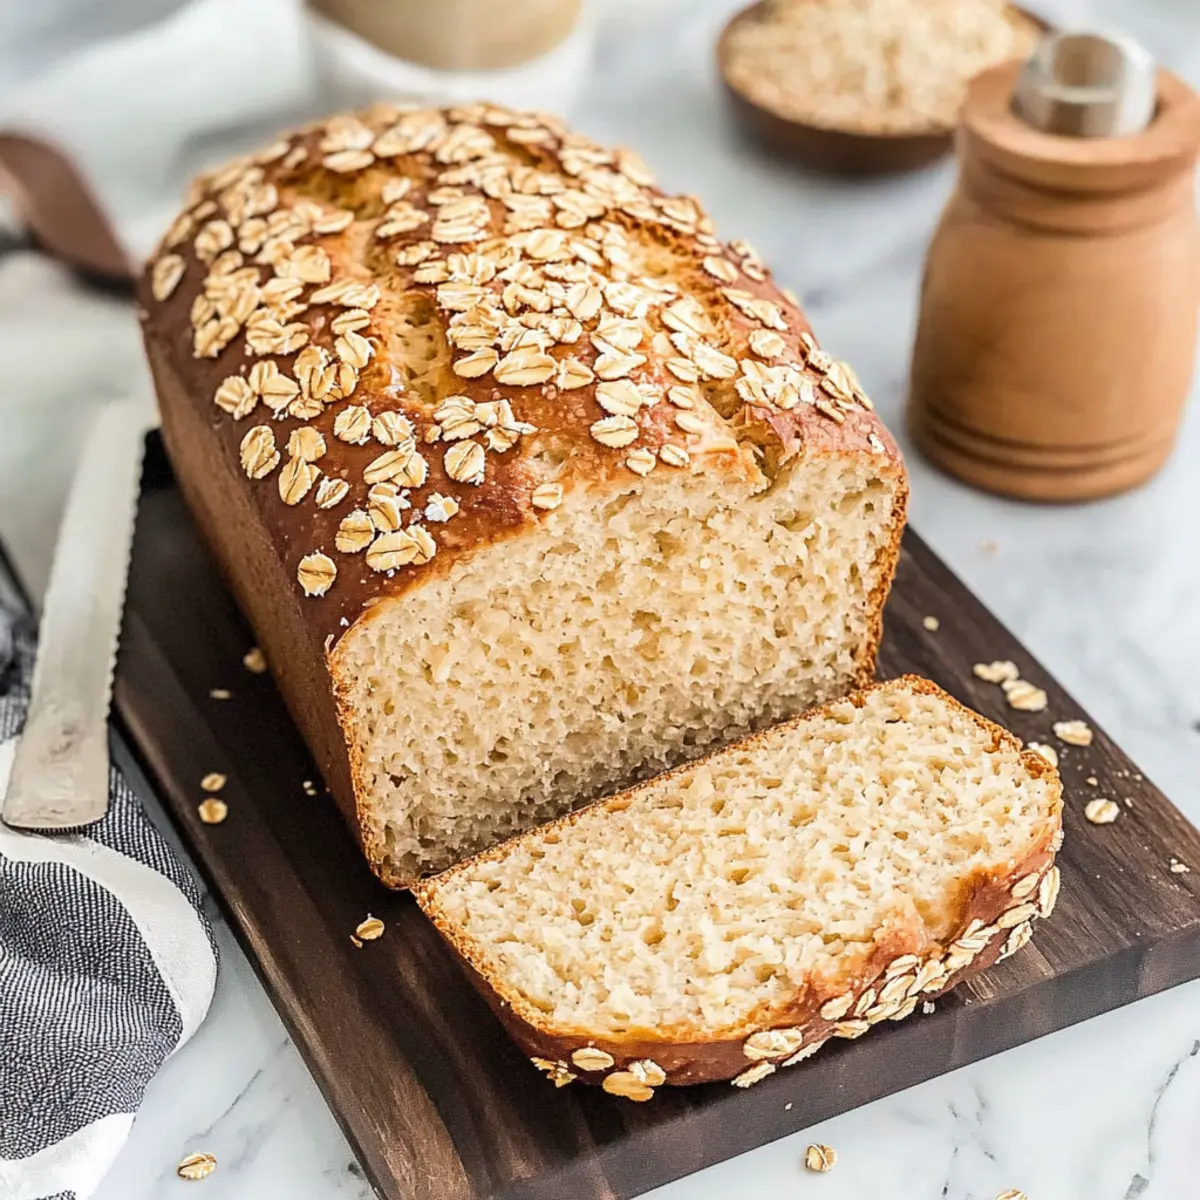
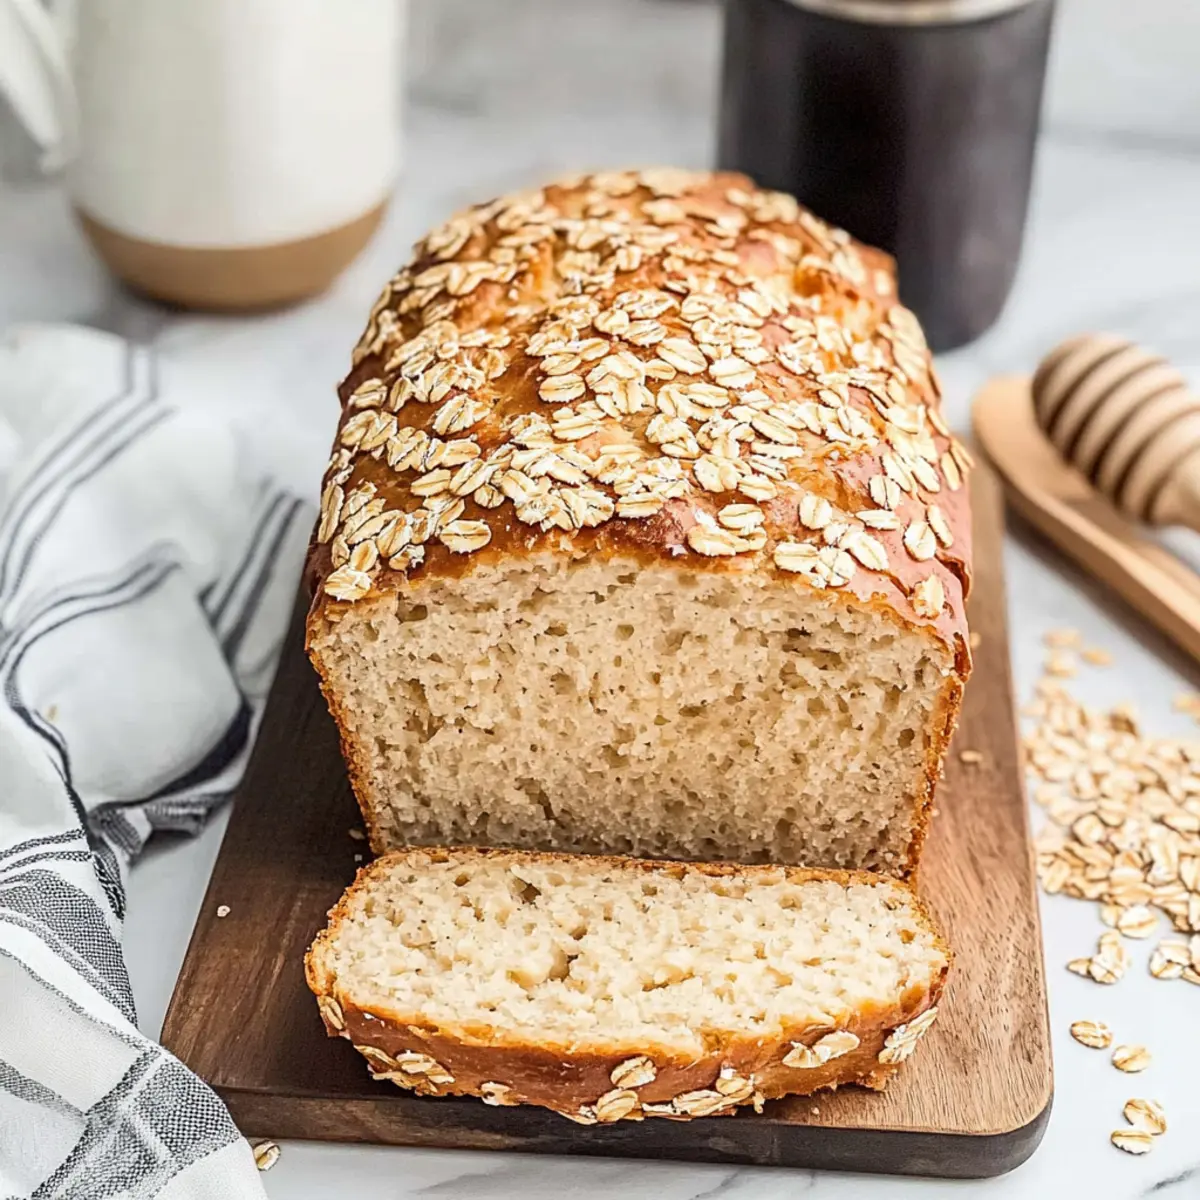
While your dough rises for the second time, preheat your oven to 350°F (175°C). Once doubled, brush the top of the loaf with generous amounts of honey, then sprinkle a handful of rolled oats for an extra touch. Place the loaf in the preheated oven and bake for 40 minutes, or until the bread is golden brown and sounds hollow when tapped on the bottom.
Step 8: Cool and Serve
After baking, remove the Honey Oat Bread from the oven and allow it to cool in the pan for about 5-10 minutes. Then, transfer it to a wire rack to cool completely before slicing. This waiting time ensures clean cuts and enhances the flavor and texture, making every slice a delight!
Expert Tips for Honey Oat Bread
-
Yeast Check: Ensure your active dry yeast is fresh and stored properly. Dormant yeast will result in no rise, leaving you with dense bread.
-
Flour Adjustments: If the dough feels sticky during kneading, gradually add small amounts of flour. Aim for a smooth, elastic texture for your Honey Oat Bread.
-
Gentle Kneading: Avoid over-kneading, especially if using a stand mixer. Stop when the dough is smooth and elastic, around 6-8 minutes for the best results.
-
Measuring Temperature: Use a thermometer to check the milk and water temperature before combining. Ideal activation of the yeast occurs around 110°F—too hot and you might kill it!
-
Even Baking: While baking, rotate your Honey Oat Bread if needed for an even brown crust. Keep an eye on it in the last few minutes to prevent over-browning.
What to Serve with Honey Oat Bread?
Experience the perfect culinary harmony when you pair this delightful homemade bread with these comforting accompaniments.
-
Creamy Avocado Toast: Spread mashed avocado on toasted slices for a creamy, earthy addition that enhances the bread’s nutty flavor.
-
Zesty Tomato Soup: The bright acidity of tomato soup creates a delightful contrast with the sweetness of the bread, making every bite a burst of flavor.
-
Savory Herb Butter: Whip together butter with fresh herbs and a pinch of salt. This rich spread elevates the honey-sweetness of the bread, enhancing its natural flavors.
-
Classic Strawberry Jam: Slather on a layer of fresh strawberry jam for a sweet and fruity treat that beautifully balances the bread’s wholesome nature.
-
Honey Drizzle: For an extra touch of sweetness, drizzle a bit of honey on warm slices. It complements the bread’s ingredients perfectly, creating a blissful experience.
-
Crunchy Salad: Serve with a fresh salad of mixed greens, cherry tomatoes, and a light vinaigrette for a refreshing contrast to the warm, fluffy bread.
-
Herbal Iced Tea: Sip on a glass of herbal iced tea alongside your bread, the cooling drink enhances the sweet, nutty flavor profiles while keeping you refreshed.
-
Mini Cheese Platter: Combine the honey oat bread with a variety of cheeses for a delightful cheese board that promises both savory and sweet notes in each bite.
How to Store and Freeze Honey Oat Bread
Room Temperature: Store your Honey Oat Bread in a bread bag or wrap it in a clean kitchen towel at room temperature for up to 3 days to keep it soft and fresh.
Fridge: If you live in a particularly warm or humid climate, you can refrigerate the bread in an airtight container for about a week, though this may slightly alter its texture.
Freezer: For longer storage, freeze the cooled bread in foil or a freezer-safe bag for up to 3 months. Allow it to thaw at room temperature before enjoying.
Reheating: When ready to eat, slice and toast your Honey Oat Bread directly from the freezer or warm in the oven at 350°F until heated through.
Make Ahead Options
These Honey Oat Bread preparations are perfect for busy home cooks looking to save time during the week! You can prepare the dough up to 24 hours in advance. After kneading, allow it to rise as instructed, then punch it down and shape it into a loaf. Wrap the loaf tightly in plastic wrap or foil and refrigerate it until you’re ready to bake. When it’s time to finish, simply let the dough sit at room temperature for about 30 minutes to warm up before preheating your oven. This way, you’ll enjoy all the fluffy, deliciousness of freshly baked Honey Oat Bread anytime, with minimal effort!
Honey Oat Bread Variations & Substitutions
Feel free to tailor this delightful Honey Oat Bread to suit your taste and dietary needs—baking should be as fun and creative as it is satisfying!
- Whole Wheat: Substitute part or all of the all-purpose flour with whole wheat flour for a heartier, denser loaf that packs in more nutrients.
- Dairy-Free: Replace unsalted butter with olive oil or coconut oil; this keeps your bread rich and moist without dairy.
- Milk Options: Use almond or coconut milk instead of whole milk for a lactose-free alternative that still delivers on creaminess.
- Additional Sweeteners: Try agave nectar or brown sugar instead of honey for a different flavor profile—experimenting can lead to delightful surprises!
- Nutty Element: Add walnuts or pecans for an extra crunch and a nutty undertone; they pair wonderfully with the oats and honeysweetness.
- Seeds for Texture: Incorporate chia seeds or sunflower seeds into the dough for added texture and a nutritious boost.
- Flavor Boost: Mix in ground cinnamon or nutmeg for a warm, aromatic twist that works beautifully with the sweetness of honey.
- Spicy Kick: Want to turn up the heat? A pinch of cayenne or red pepper flakes can add a surprising depth to your bread, making it truly unique!
See how these variations can elevate your baking experience—imagine enjoying a slice of this adaptable bread with a drizzle of Sweet Harmony Honey or alongside a warm bowl of Hot Honey Chicken. The possibilities are endless!
Honey Oat Bread Recipe FAQs
How do I select the best oats for Honey Oat Bread?
Absolutely! For this recipe, I recommend using rolled oats as they add great texture. Look for oats that are whole and not too crushed; avoid oats with added sugars or flavors. Quick oats can be substituted in a pinch, but rolled oats will give your bread the best structure and flavor.
What’s the best way to store Honey Oat Bread?
I often store my Honey Oat Bread at room temperature in a bread bag or wrapped in a clean kitchen towel, where it stays fresh for up to 3 days. For longer storage, wrap it tightly in foil or place it in a freezer-safe bag and freeze it for up to 3 months. Let it thaw at room temperature when you’re ready to enjoy it!
Can I freeze Honey Oat Bread?
Yes, indeed! To freeze your Honey Oat Bread, first allow it to cool completely after baking. Once cooled, wrap the loaf tightly in foil or place it in a freezer-safe bag. It’s best used within 3 months for optimal flavor, but it can last longer if stored properly. When ready to enjoy, thaw it on the counter and slice it as needed.
What if my dough doesn’t rise?
Very good question! If your dough isn’t rising, the culprit is likely inactive yeast. Make sure to check that your yeast is fresh—if it’s old or has been improperly stored, it won’t activate. If it’s not bubbling when stirred into warm water, it’s time to get new yeast. Also, ensure that your liquid isn’t too hot; it should be around 110°F for optimal yeast activation.
Is Honey Oat Bread suitable for people with dietary restrictions?
Yes, it can be! This recipe contains no processed sugars, making it a healthier option, but it’s also essential to be mindful of dietary restrictions. The bread contains gluten from the all-purpose flour and dairy from the butter and milk. For a gluten-free version, substitute with a gluten-free flour blend and use almond or coconut milk for a dairy-free option. Additionally, if anyone in your household has a honey allergy, you can substitute with maple syrup instead.
Honey Oat Bread: Fluffy, Healthier Homemade Delight
Ingredients
Equipment
Method
- In a large mixing bowl or stand mixer, combine 3 cups of all-purpose flour, 1 cup of rolled oats, 2 teaspoons of active dry yeast, and 1 teaspoon of salt. Mix thoroughly.
- In a saucepan over medium heat, combine 1 cup of whole milk and 4 tablespoons of unsalted butter. Heat until the butter melts completely without boiling. Stir in ¼ cup of honey and ¾ cup of lukewarm water.
- Pour the warm milk mixture into the bowl of dry ingredients and mix until a shaggy dough forms.
- Transfer the dough to a floured surface or keep in the mixer and knead until smooth and elastic, about 10 minutes by hand or 6-8 minutes with a stand mixer.
- Place the kneaded dough into a lightly oiled bowl, cover, and let it rise in a warm area for about 30-60 minutes, until doubled in size.
- Punch down the risen dough and shape it into a loaf. Place it in a greased 9x5 inch loaf pan and let it rise again for another 30-60 minutes.
- Preheat your oven to 350°F. After the second rise, brush the loaf with honey and sprinkle with rolled oats. Bake for 40 minutes or until golden brown.
- Allow the bread to cool in the pan for 5-10 minutes, then transfer to a wire rack to cool completely before slicing.
Leave a Reply