
As I wandered through the bustling aisles of my local farmers’ market, a stunning sight caught my eye: jars filled with rich caramel and decadent chocolate drizzles, ready to transform any dessert into something extraordinary. That’s when the inspiration hit me for these delightful No Bake Turtle Mini Cheesecakes. Perfectly simple to whip up, these treats are a showstopper for any gathering, or even a cozy night in. Not only are they wonderfully quick to prepare, but their individual servings make them an ideal crowd-pleaser. Plus, with no oven required, you can indulge in the sweet, nostalgic flavors of turtle candy any time you crave it. So, are you ready to bring a touch of bliss to your dessert table with these easy-to-make mini cheesecakes?
Why are No Bake Turtle Mini Cheesecakes a Must-Try?
Delightful Simplicity: Just a few easy steps transform simple ingredients into a rich dessert—no baking required!
Irresistible Flavor: The combination of chocolate, caramel, and cream cheese creates a dreamy and satisfying experience.
Individual Servings: Perfectly portioned, these mini cheesecakes are ideal for sharing at gatherings or enjoying solo.
Versatile Toppings: Experiment with your favorite sauces or nuts, like those from these Pumpkin Cheesecake Cookies for complementary flavors!
Quick Prep Time: With just a couple of hours to chill, you can impress guests in no time.
Gorgeous Presentation: Visually stunning and entirely customizable, they make your dessert table shine!
No Bake Turtle Mini Cheesecake Ingredients
-
For the Crust
-
Graham Cracker Crumbs – Sweet and crunchy base; for a gluten-free version, use gluten-free graham crackers or alternative cookies.
-
Unsalted Butter (melted) – Binds the crust together; ensure it’s fully melted for best mixing.
-
Sugar – Adds sweetness to the crust; adjust to taste, or use a sugar substitute if desired.
-
For the Filling
-
Cream Cheese (softened) – Creamy base for the cheesecake; important to soften to avoid lumps; can be substituted with a dairy-free cream cheese.
-
Powdered Sugar – Sweetens the filling; use less for a less sweet taste or sugar alternatives for health considerations.
-
Vanilla Extract – Enhances flavor; vanilla bean paste can be used as a substitute for a more intense flavor.
-
Whipped Topping – Adds lightness and fluffiness; opt for a whipped coconut cream for a dairy-free alternative.
-
For the Toppings
-
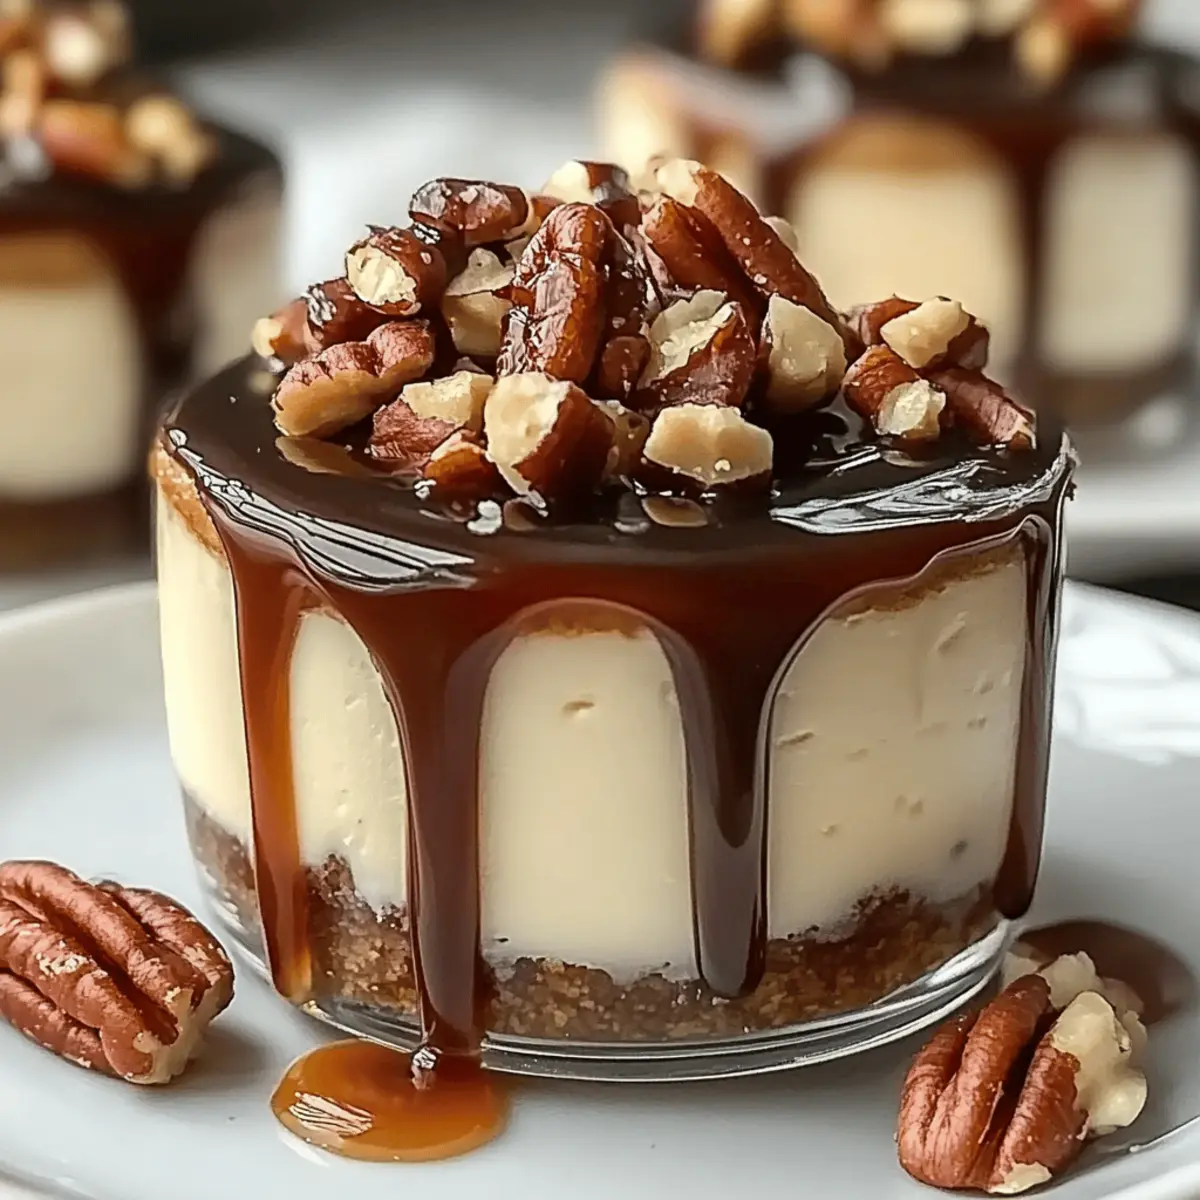
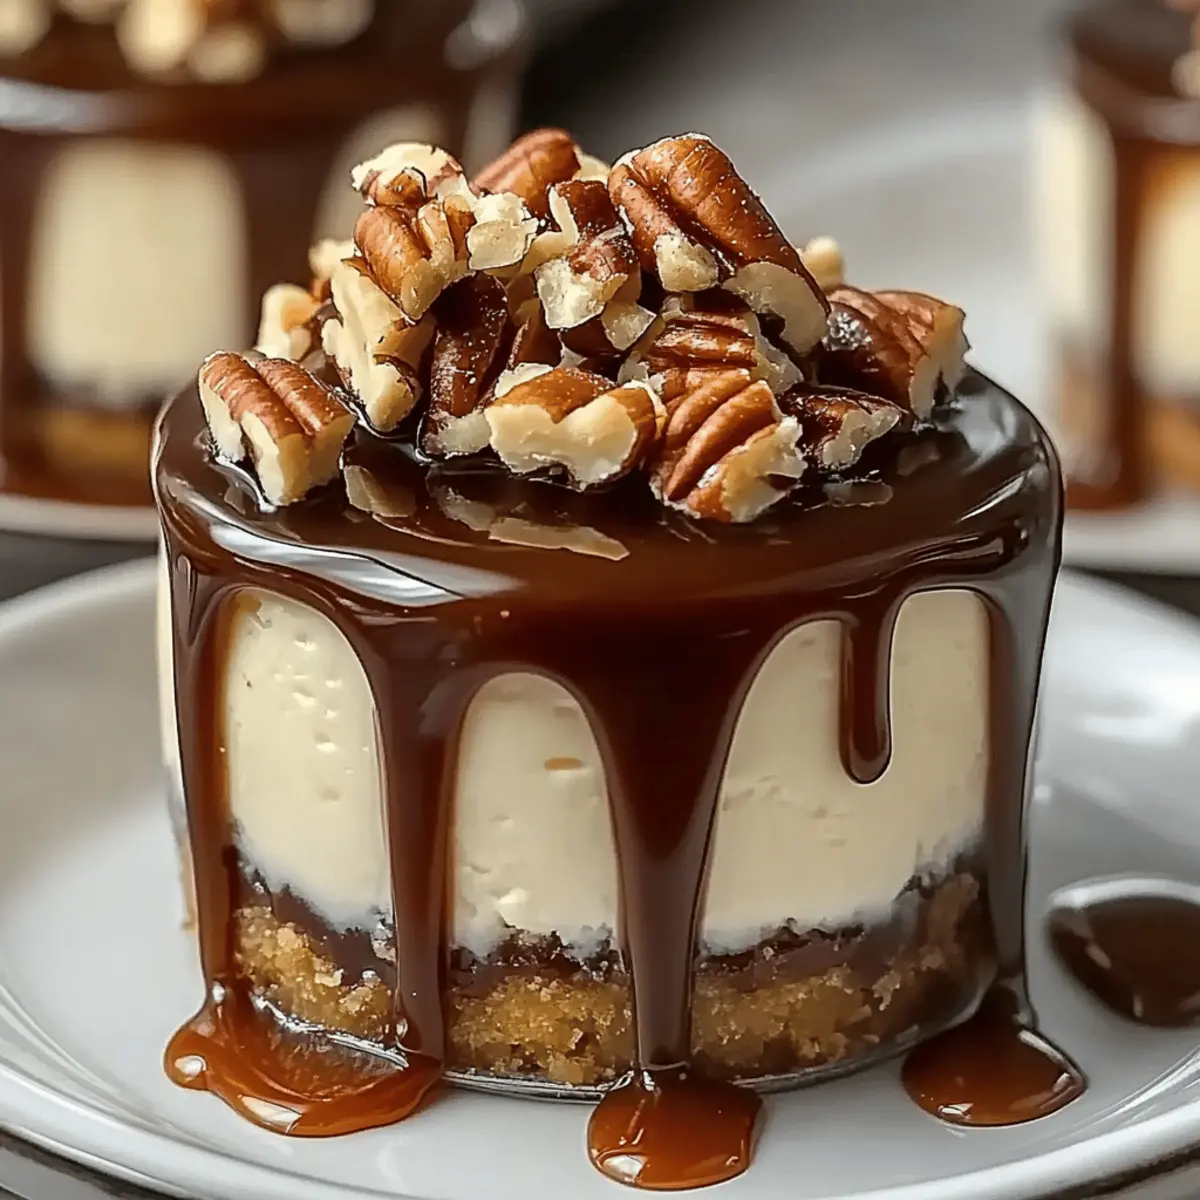
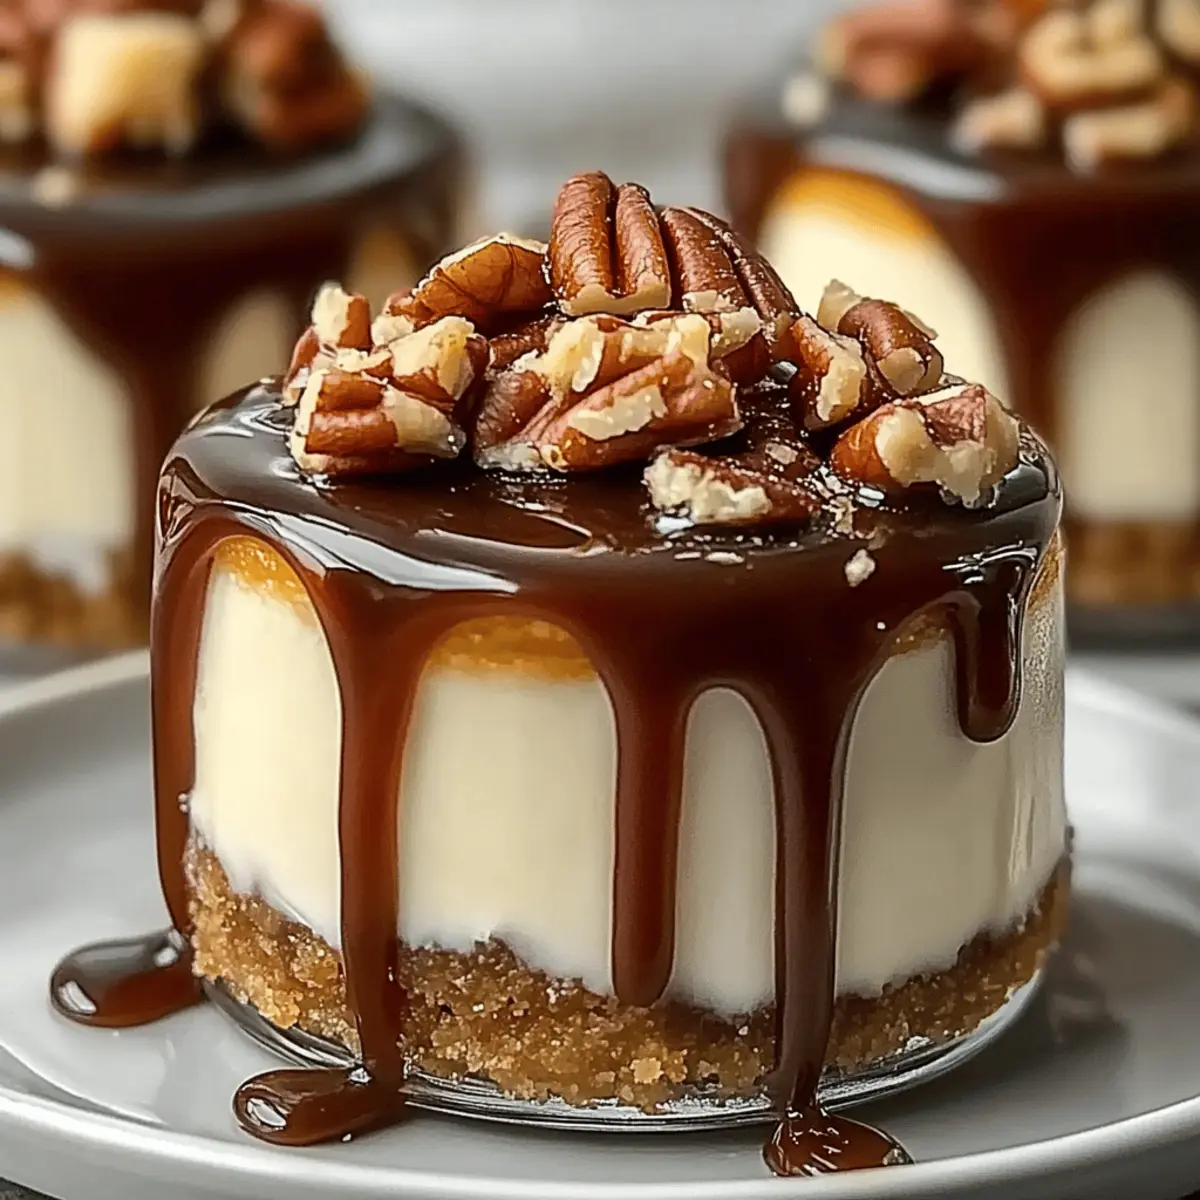
Caramel Sauce – Signature turtle flavor; store-bought or homemade can be used; check for dairy-free brands if needed.
-
Chocolate Sauce – Richness and decadence; use chocolate syrup or melted chocolate; consider dark chocolate for an intense flavor.
-
Chopped Pecans (for garnish) – Provides crunch; substitute with walnuts or omit for a nut-free version.
Step‑by‑Step Instructions for No Bake Turtle Mini Cheesecake
Step 1: Prepare the Crust
In a mixing bowl, combine graham cracker crumbs, melted unsalted butter, and sugar until the mixture resembles wet sand. Using a small spoon or your fingers, press the crust mixture firmly into the bottoms of mini cheesecake cups or a lined muffin tin to create an even layer. Chill in the refrigerator for about 15 minutes to allow the crust to set.
Step 2: Make the Cheesecake Filling
In a large mixing bowl, use an electric mixer to beat the softened cream cheese until smooth and creamy, about 2 minutes. Gradually add powdered sugar and vanilla extract, mixing until fully incorporated. Gently fold in whipped topping with a spatula until the mixture is well-combined but still light and airy. This luscious filling is the heart of your No Bake Turtle Mini Cheesecakes!
Step 3: Assemble the Cheesecakes
Once the crusts are set, remove them from the refrigerator. Spoon the cheesecake filling generously into each crust, smoothing the tops with a spatula for an even finish. Cover the mini cheesecakes with plastic wrap and refrigerate for at least 2 hours or until fully set and slightly firm to the touch, allowing those creamy flavors to meld beautifully.
Step 4: Add Toppings
After chilling, drizzle caramel sauce and chocolate sauce over each mini cheesecake, creating a deliciously decadent topping. Be as generous as you like! Finally, sprinkle with chopped pecans for that signature crunch. Serve your No Bake Turtle Mini Cheesecakes cold and savor the delightful combination of textures and flavors.

What to Serve with No Bake Turtle Mini Cheesecakes
Indulging in these decadent treats opens the door to a delightful meal full of flavors that perfectly complement their sweetness.
-
Fresh Berries: Bright and juicy, they add a refreshing contrast to the richness of the mini cheesecakes, making each bite delightful. A vibrant mix of strawberries and blueberries can elevate your dessert experience.
-
Coffee or Espresso: The deep, aromatic flavors of coffee draw out the richness of the chocolate and caramel, enhancing the overall dessert experience. Sipping a warm cup alongside can turn your dessert into a cozy ritual.
-
Vanilla Ice Cream: A scoop of creamy vanilla ice cream brings a cool, velvety texture that pairs beautifully with the cheesecake. It’s the perfect companion for balancing the sweetness and creating a blissful harmony.
-
Caramel Drizzle: An extra drizzle of caramel sauce on your plates can enhance the dessert’s visual appeal while infusing additional sweet flavor. It’s like giving each mini cheesecake a dreamy bath of indulgence.
-
Chocolate-Dipped Strawberries: These add a fun and elegant touch, offering a playful flavor combo that complements the cheesecake beautifully. The contrast of textures makes each bite an affair to remember.
-
Whipped Cream: Light and airy whipped cream adds a lovely fluffiness alongside each mini cheesecake, making it feel extra special. You can even flavor it with a hint of vanilla or cocoa for a twist.
-
Nutty Shortbread Cookies: Pair with these crunchy cookies beside each cheesecake for an added layer of texture. Their buttery flavor will harmonize with the cheesecake’s richness, creating a delightful tasting experience.
-
Hazelnut Coffee: As a unique pairing, the nutty notes from hazelnut coffee can enhance the flavors found in both chocolate and caramel, crafting an utterly indulgent end to your meal.
-
Creamy Fruit Smoothie: A chilled fruit smoothie can provide a refreshing contrast and cleanse the palate between bites of the rich cheesecake. Opt for mango or banana for an extra creamy texture.
Make Ahead Options
These No Bake Turtle Mini Cheesecakes are perfect for meal prep enthusiasts! You can prepare the crust and the cheesecake filling up to 24 hours in advance. Simply mix the graham cracker crumbs, melted butter, and sugar for the crust, and store it in an airtight container in the refrigerator. For the filling, whip up the cream cheese, powdered sugar, vanilla, and whipped topping, then refrigerate it separately. When you’re ready to serve, fill the crusts with the chilled cheesecake mixture, refrigerate for at least 2 hours to set, and then top with caramel, chocolate sauce, and pecans. This way, you’ll have a delightful dessert ready to impress with minimal last-minute effort!
No Bake Turtle Mini Cheesecake Variations
Feel free to let your creativity shine with these delightful twists that enhance the flavors and textures of your No Bake Turtle Mini Cheesecakes!
- Gluten-Free: Use crushed gluten-free cookies instead of graham cracker crumbs to cater to dietary needs.
- Sugar-Free: Swap out the regular sugar with your favorite sugar substitute, like stevia or erythritol, for a guilt-free dessert.
- Dairy-Free: Replace cream cheese with vegan cream cheese and use a coconut-based whipped topping for a completely dairy-free version.
- Nut-Free: Omit the pecans entirely or use sunflower seeds for a crunchy finish that avoids allergens, ensuring everyone can enjoy!
- Chocolate Lovers: For a richer experience, substitute graham crackers with crushed chocolate cookies or add melted chocolate into the filling.
- Fruit Twist: Drizzle fresh berry sauces, like strawberry or raspberry, on top for a fruity flavor that complements the richness of chocolate and caramel.
- Extra Caramel: Want more indulgence? Pour a generous layer of caramel sauce beneath the cheesecake filling for a delicious surprise!
- Crunchy Texture: Add a layer of crushed nuts or toffee bits on top before the sauce for an added crunch, reminiscent of classic turtle candies.
These No Bake Turtle Mini Cheesecakes are easily customizable! If you’re looking for further inspiration, try using toppings inspired by Apple Cider Cheesecake or explore complementary flavors with Vanilla Bean Cheesecake. Let your imagination guide you, and enjoy every sweet moment!
Expert Tips for No Bake Turtle Mini Cheesecakes
- Cream Cheese Care: Ensure cream cheese is fully softened before mixing; cold cream cheese can lead to lumps in your filling.
- Gentle Mixing: Avoid overmixing after adding whipped topping to keep the filling light and fluffy.
- Chill Properly: Don’t skip the chilling step; at least 2 hours in the fridge allows the flavors to meld and the texture to set perfectly.
- Crust Consistency: Make sure to press the crust mixture firmly into the cups; a well-packed crust will hold together much better when serving.
- Topping Options: Get creative with toppings! Use different flavored sauces or nut alternatives to customize your No Bake Turtle Mini Cheesecakes to your liking.
- Serve with Style: For an elegant touch, consider garnishing with fresh whipped cream or a sprinkle of sea salt to elevate the dessert experience.
Storage Tips for No Bake Turtle Mini Cheesecakes
Fridge: Keep your mini cheesecakes stored in an airtight container in the refrigerator for up to 3 days to maintain freshness.
Freezer: If you want to extend their shelf life, place the mini cheesecakes in a freezer-safe container and freeze for up to 2 months. Thaw in the fridge overnight before serving.
Reheating: There’s no need to reheat these no bake treats; simply serve chilled to enjoy their creamy texture and delightful flavor.
Prep Ahead: You can make these mini cheesecakes a day in advance for convenience, allowing the flavors to meld beautifully overnight.
No Bake Turtle Mini Cheesecake Recipe FAQs
How do I choose the right ingredients for my No Bake Turtle Mini Cheesecakes?
Absolutely! When selecting your ingredients, aim for fresh, high-quality cream cheese, as this is the base of your cheesecake filling. Look for softened cream cheese to prevent lumps; ideally, plan to take it out of the fridge at least 30 minutes before using. For the graham cracker crumbs, ensure they are fresh—if you see any dark spots or an off smell, it’s best to replace them.
What is the best way to store No Bake Turtle Mini Cheesecakes?
You can keep your delicious mini cheesecakes in an airtight container in the refrigerator for up to 3 days. To ensure optimal freshness, it’s best to store them covered until you’re ready to serve. This way, you avoid any potential drying out or absorbing unwanted odors from your fridge.
Can I freeze No Bake Turtle Mini Cheesecakes?
Very! To freeze your mini cheesecakes, place them in a freezer-safe container, separating layers with parchment paper to prevent sticking. They can be frozen for up to 2 months. When you’re ready to enjoy, let them thaw in the fridge overnight; this retains their creamy texture beautifully without compromising flavor!
What should I do if my cheesecake filling is lumpy?
If your filling ends up lumpy, don’t worry! First, make sure your cream cheese is softened well—this is key. If it appears lumpy after mixing, use an electric mixer to blend it more until smooth. Another option is to pass the mixture through a fine-mesh sieve to remove any lumps gently. Just take your time, and you’ll have a lovely, creamy texture in the end!
Are there any dietary considerations for these mini cheesecakes?
Absolutely! If you’re catering to dietary restrictions, you can easily adapt this recipe. For a dairy-free alternative, look for the versions of cream cheese, whipped topping, and caramel sauce made from coconut or other plant-based options. Additionally, ensure any substitute you choose is free from allergens you or your guests may have, like gluten or nuts. Customize to taste, and everyone will be able to enjoy these delightful treats!
How long do the mini cheesecakes need to chill before serving?
The chilling step is crucial! Refrigerate the assembled mini cheesecakes for at least 2 hours. This allows them to set properly, ensuring they maintain their shape and have a lovely creamy consistency when served. If you have the time, chilling them overnight can deepen the flavors even more!
No Bake Turtle Mini Cheesecake: A Decadent Treat!
Ingredients
Equipment
Method
- In a mixing bowl, combine graham cracker crumbs, melted unsalted butter, and sugar until the mixture resembles wet sand. Press the crust mixture firmly into the bottoms of mini cheesecake cups or a lined muffin tin. Chill in the refrigerator for about 15 minutes to allow the crust to set.
- In a large mixing bowl, beat the softened cream cheese until smooth and creamy. Gradually add powdered sugar and vanilla extract, mixing until fully incorporated. Gently fold in whipped topping until well-combined but still light and airy.
- Once the crusts are set, spoon the cheesecake filling into each crust, smoothing the tops with a spatula. Cover the mini cheesecakes with plastic wrap and refrigerate for at least 2 hours until fully set.
- After chilling, drizzle caramel sauce and chocolate sauce over each mini cheesecake, then sprinkle with chopped pecans. Serve cold and enjoy!
Leave a Reply