
There’s something magical about recreating your favorite fast-food favorites at home, and this Homemade Chalupa is no exception! Imagine biting into a warm, crispy shell that gives way to a fluffy interior, generously filled with all your favorite toppings. This Taco Bell copycat recipe not only lets you satisfy those cravings but also lets you customize it to your taste—perfect for busy weeknights or casual gatherings with friends. With quick prep and endless variations—from vegetarian to fully loaded—this dish offers a delightful way to bring restaurant vibes directly to your kitchen. Ready to dive into a satisfying homemade version? Let’s get cooking!
Why Make a Homemade Chalupa?
Customization at Your Fingertips: Create your ideal chalupa with a myriad of toppings, from classic sour cream to spicy jalapeños.
Quick and Easy: With just a few simple ingredients and steps, you’ll have a satisfying meal ready in no time.
Healthy Alternatives: Switch to whole wheat flour or load them with fresh veggies for a guilt-free indulgence.
Crowd-Pleasing Treat: Perfect for parties or family dinners, everyone can personalize their chalupa to suit their taste.
Comfort Food Redefined: This recipe delivers all the flavors and nostalgia of Taco Bell, but made fresh in your own kitchen. Enjoy even more delicious recipes with easy-to-make vegetarian dishes that you and your guests will love!
Homemade Chalupa Ingredients
For the Chalupa Shells
- All-Purpose Flour – Forms the base of the chalupa bread; can substitute with 50% whole wheat flour for added health benefits.
- Baking Powder – Important for creating a light, airy texture; do not omit!
- Salt – Enhances overall flavor; adjust according to your preference.
- Melted Butter – Adds richness and flavor to the dough; use oil as a substitute for a vegan option.
- Milk (preferably full fat) – Moistens the dough; skim milk is a viable substitute for a lighter version.
- Oil for frying – Essential for achieving that perfect crispy shell; canola or vegetable oil works great.
For the Toppings
- Black Beans – Packed with protein and adds flavor; feel free to swap for refried beans if preferred.
- Lettuce – Provides a fresh, crunchy bite; any type of salad greens will do.
- Tomatoes – Bring juiciness and acidity; any fresh tomato variety is perfect.
- Sour Cream – Creamy contrast to the ingredients; vegan sour cream can easily be used for a plant-based option.
- Queso Sauce – Adds a cheesy kick; substitute with any cheese sauce or simply leave it out for a lighter dish.
- Cheese (e.g., pepper jack) – For an extra touch of richness; you can use your favorite cheese or skip it for a dairy-free treat.
Enjoy crafting your Homemade Chalupa with these simple ingredients, and dive into the customization options that will wow your family and friends!
Step‑by‑Step Instructions for Homemade Chalupa
Step 1: Prepare the Dough
In a large mixing bowl, combine 2 cups of all-purpose flour, 1 teaspoon baking powder, and 1/2 teaspoon salt. Add 2 tablespoons of melted butter and pour in 3/4 cup of milk. Mix until a soft dough forms, ensuring there are no dry spots. Knead the dough lightly on a floured surface for about 2 minutes until smooth, then cover and let it rest for 15-20 minutes. This allows the gluten to relax for better shaping.
Step 2: Shape the Dough
After resting, divide the dough into 15 equal portions using a knife or dough scraper. Roll each piece into a ball, then flatten into a 5-inch circle using a rolling pin. To prevent puffing while frying, prick each circle multiple times with a fork. As you prepare the shapes, heat a deep skillet with about 2 inches of oil over medium heat until hot, around 350°F.
Step 3: Fry the Chalupa Shells
Carefully place one dough circle in the hot oil. Fry for approximately 1 minute or until it begins to float and puff up. Using tongs, gently fold the chalupa in half while frying, maintaining the shell shape. Fry for an additional minute until golden brown and crispy. Once done, remove from the oil and drain on paper towels. Repeat this process for the remaining dough circles, ensuring the oil maintains the right temperature.
Step 4: Prepare the Toppings
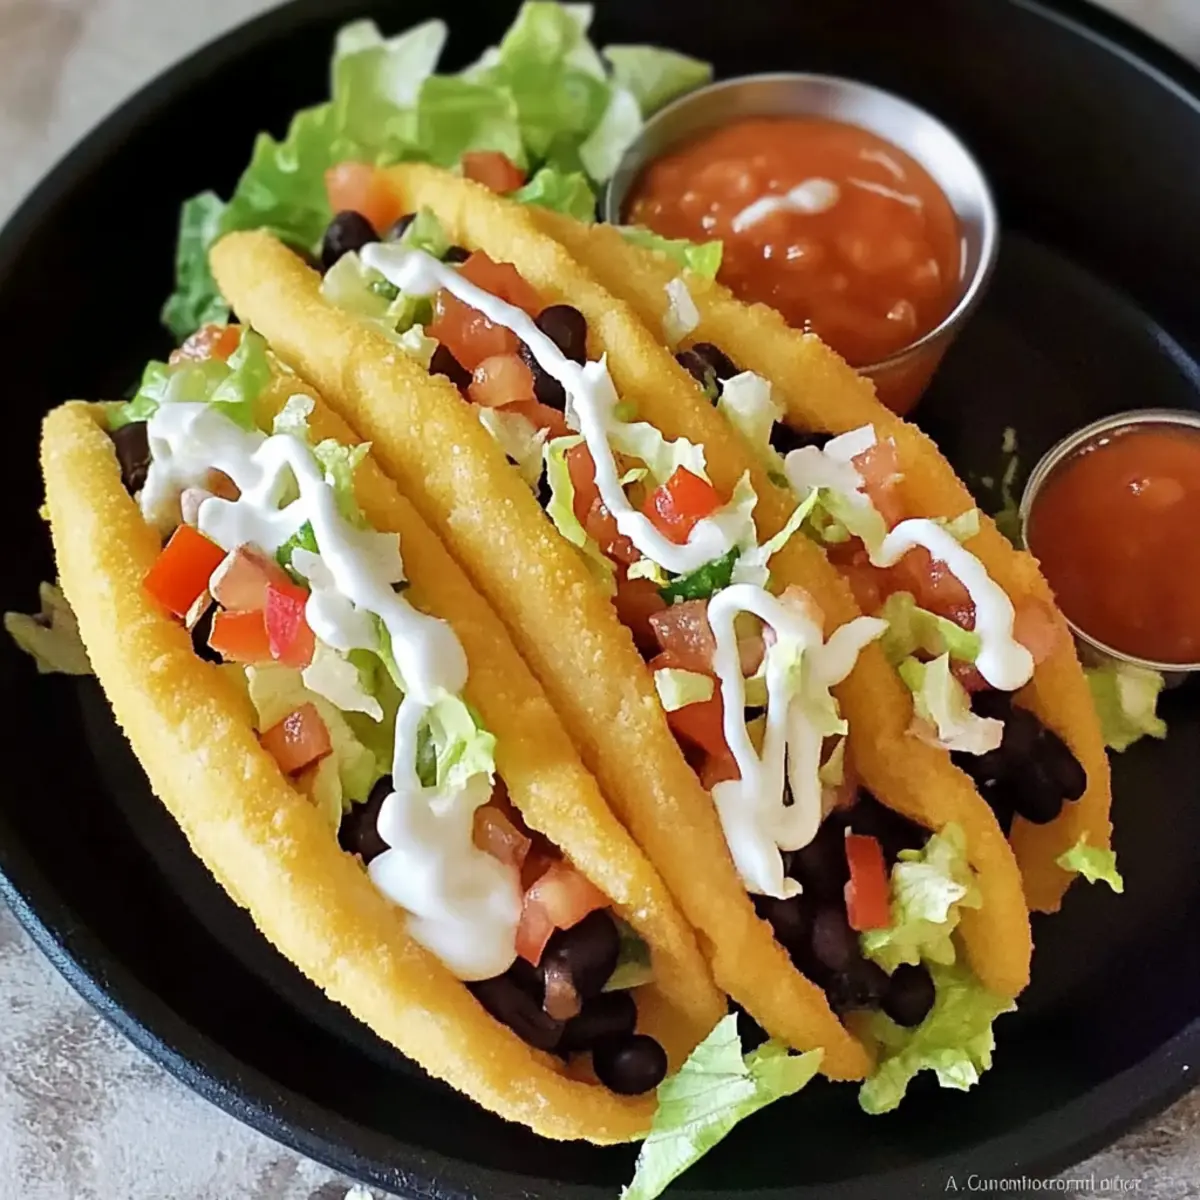
While the chalupa shells cool slightly, prepare your toppings. Drain canned black beans and warm them over medium heat until heated through, about 5 minutes. Chop fresh lettuce and tomatoes into bite-sized pieces. Set out bowls of sour cream, queso sauce, and shredded cheese to have everything ready for assembly. Your homemade chalupa toppings will create a delightful flavor explosion!
Step 5: Serve Your Homemade Chalupa
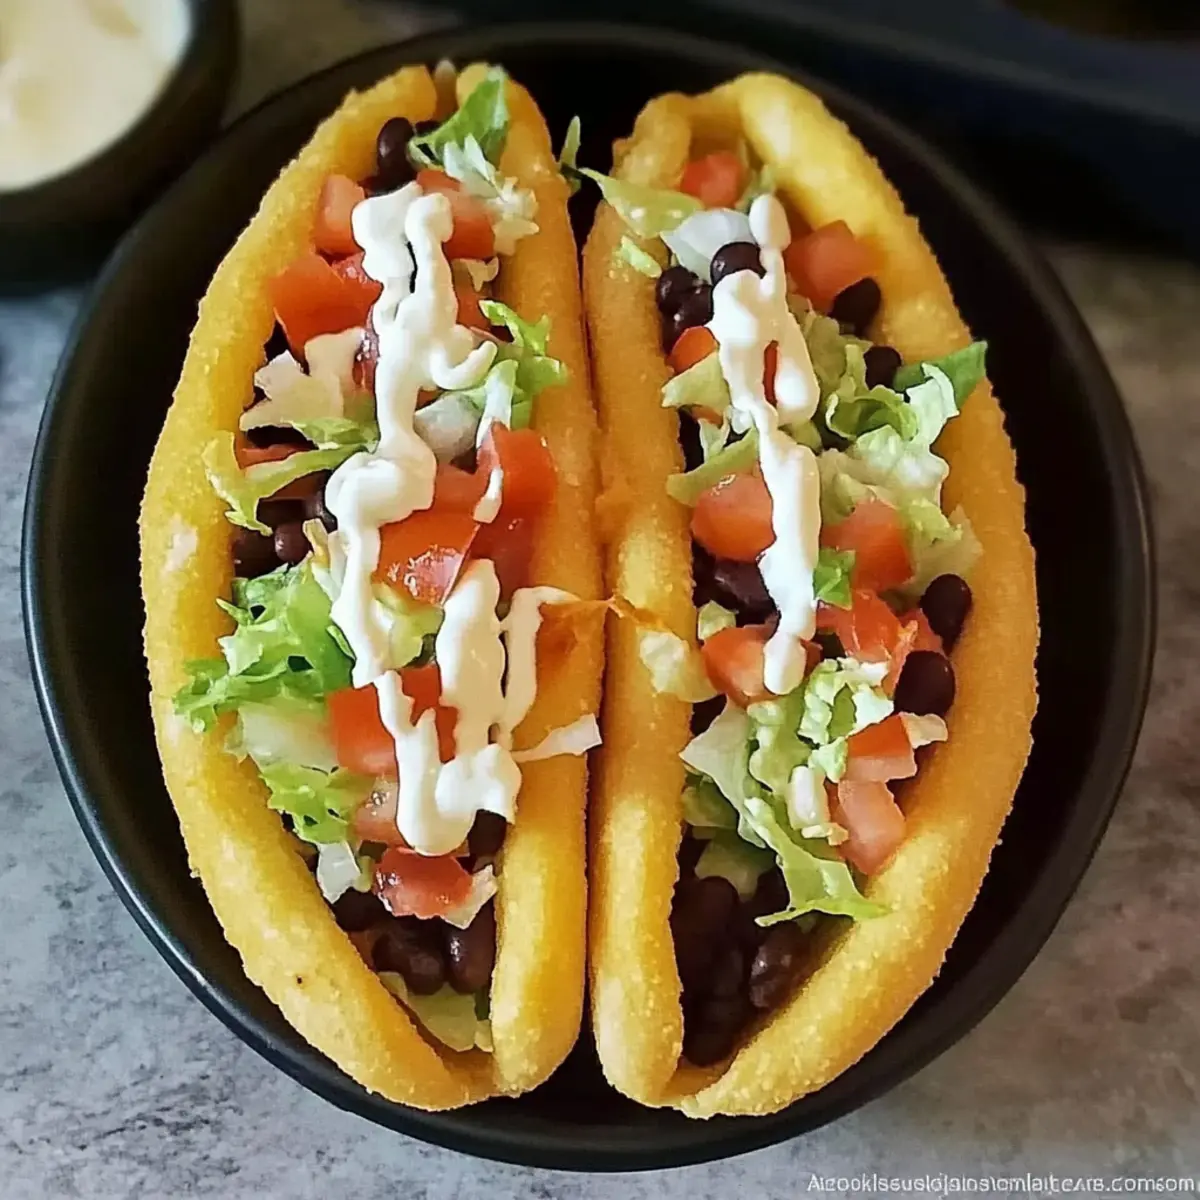
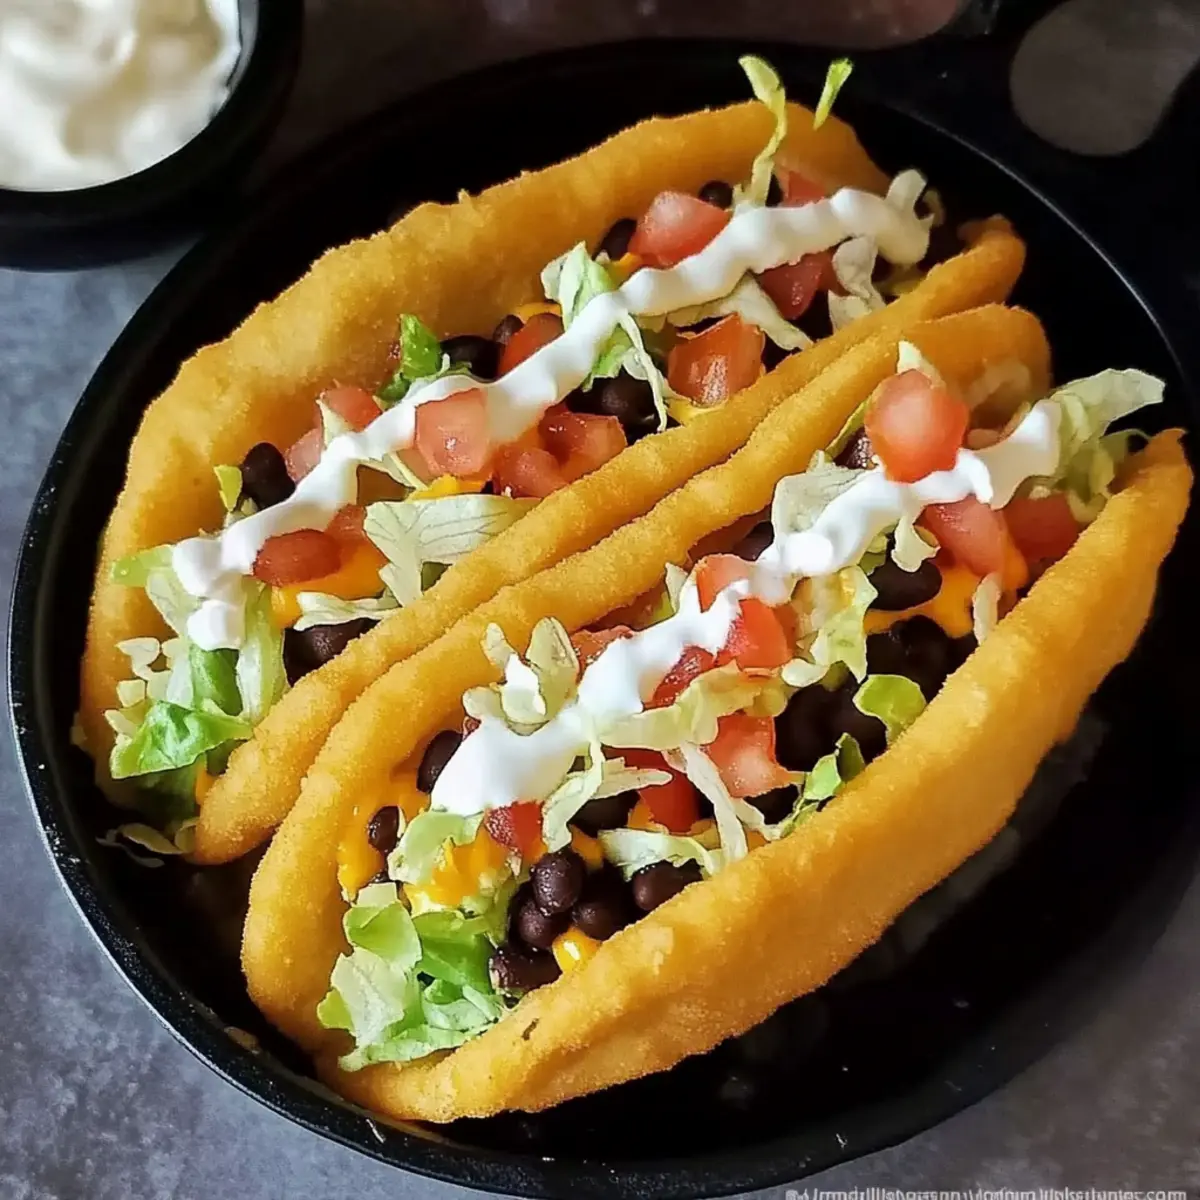
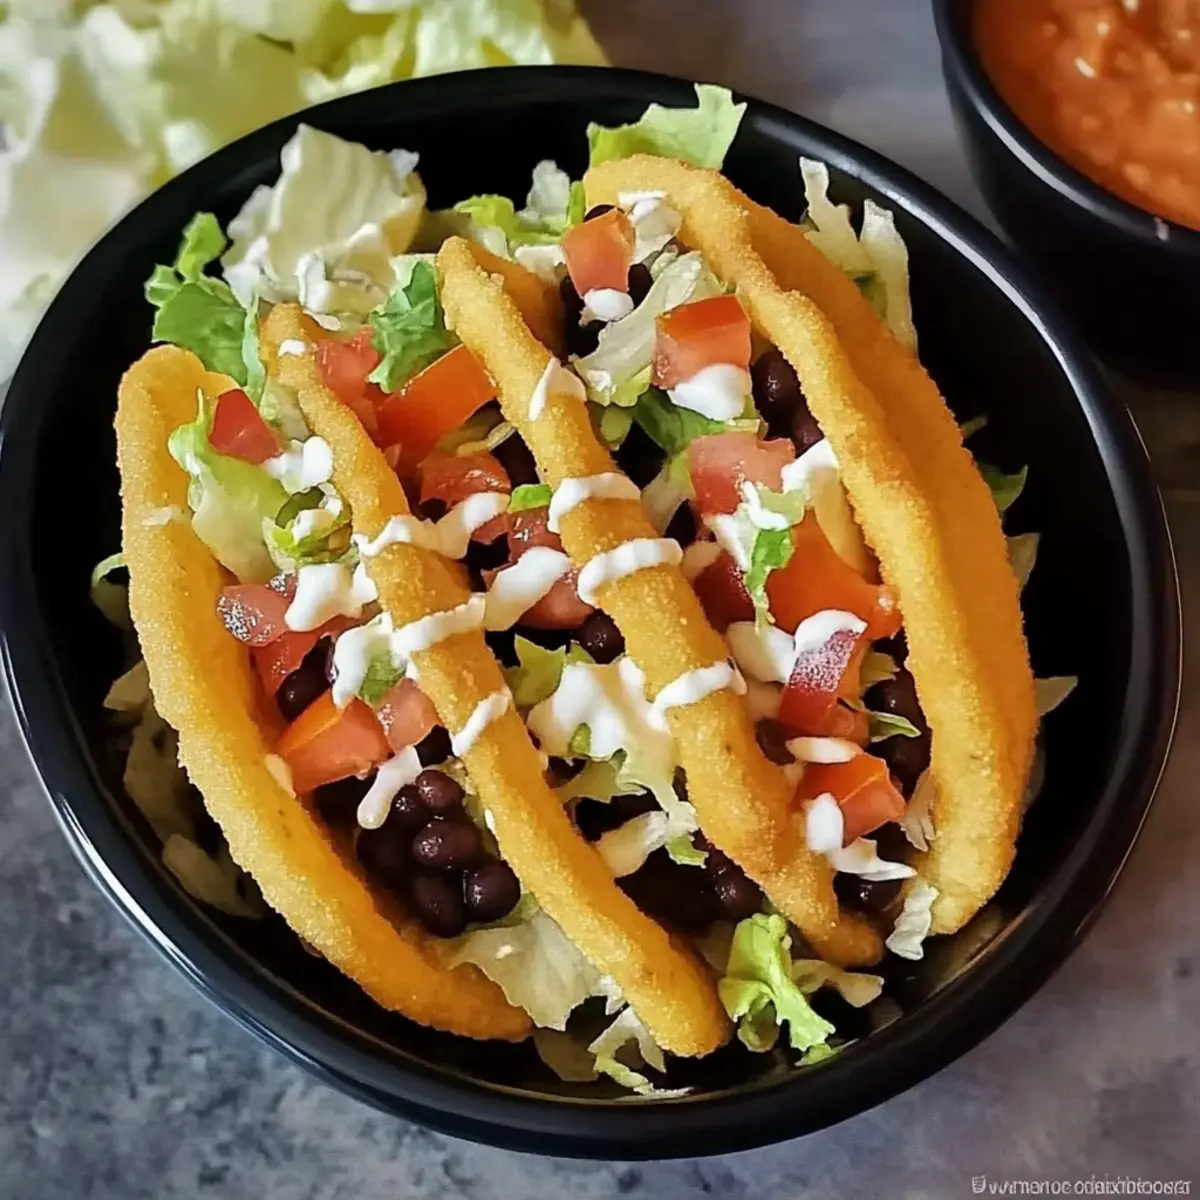
Fill each chalupa shell with a layer of warm black beans, followed by a generous helping of lettuce, diced tomatoes, and drizzles of sour cream and queso sauce. You can also sprinkle cheese on top for extra richness. Enjoy your homemade chalupas immediately while the shells are crispy and the toppings are fresh. Set out hot sauce on the side for those looking to spice things up!
Make Ahead Options
These Homemade Chalupas are perfect for busy weeknights or meal-prepping enthusiasts! You can prepare the chalupa dough up to 24 hours in advance by mixing and kneading it, then cover and refrigerate it until you’re ready to fry. Additionally, you can prep the toppings like black beans, lettuce, and tomatoes up to 3 days ahead. Store them in airtight containers in the fridge to maintain freshness. When it’s time to serve, simply retrieve the dough and let it rest for about 15 minutes at room temperature before frying. This way, you’ll enjoy delicious, homemade chalupas with minimal effort, ready to impress your family!
Homemade Chalupa Variations & Substitutions
Get ready to make this recipe your own as you explore exciting twists and substitutions to delight your taste buds!
- Whole Wheat Flour: Swap half of the all-purpose flour for whole wheat for a hearty, nutty flavor.
- Vegan Option: Replace melted butter with olive oil and use plant-based milk for a delicious vegan chalupa.
- Protein-Packed: Try filling your chalupas with grilled chicken or beef for a satiating meal that packs a punch!
- Zesty Salsa: Instead of sour cream, use fresh salsa or a zesty avocado lime crema for a refreshing twist.
- Spicy Kick: Add sliced jalapeños or a drizzle of your favorite hot sauce for those who like it spicy.
- Cheese Variations: Experiment with different cheeses, such as feta or goat cheese, to add unique flavors to your chalupa.
- Crunchy Veggies: Load them up with sautéed bell peppers, corn, or even roasted sweet potatoes for extra texture and flavor.
- Sweet Chalupa: Embrace your sweet tooth by topping warm chalupa shells with cinnamon sugar and fresh fruits for a unique dessert.
Each of these variations allows you to create a new favorite. Dive into more culinary delights by exploring easy-to-make vegetarian dishes and bring even more flavor to your mealtime!
How to Store and Freeze Homemade Chalupa
Room Temperature: Keep leftover chalupa shells in a cool, dry place for up to 2 days in an airtight container to maintain their crispiness.
Fridge: Store any remaining chalupa shells in the refrigerator for up to a week. Reheat in an oven at 350°F for best results.
Freezer: Freeze the dough before frying for up to 3 months. Wrap tightly in plastic wrap and foil, then thaw overnight in the fridge before frying.
Reheating: Reheat bakers’ leftover chalupas in the oven or skillet to retain that crunchy texture instead of using a microwave. Enjoy your satisfying homemade chalupa!
Expert Tips for Homemade Chalupa
- Perfect Dough Texture: Ensure the dough is not too sticky. If it sticks to your hands, add a little more flour while kneading to achieve a soft, pliable texture.
- Hot Oil Required: Always test the oil’s temperature before frying; use a small piece of dough—if it bubbles quickly, it’s ready. Underheating can lead to greasy chalupas that won’t puff.
- Avoid Overcrowding: Fry only a few chalupa shells at a time to keep the oil temperature consistent, ensuring each chalupa puffs beautifully.
- Resting the Dough: Letting the dough rest is essential for the gluten to relax, making it easier to roll out and fry into perfect homemade chalupa shells.
- Customizing Toppings: Get creative! Mix and match your favorite toppings according to your dietary preferences, whether you want it vegetarian or fully loaded with meat.
- Storing Leftovers: Any leftover chalupa shells can be stored in an airtight container for two days or frozen. Just reheat them in the oven for crispy results.
Enjoy your delicious homemade chalupa experience!
What to Serve with Homemade Chalupa
Elevate your homemade Chalupa experience with these delightful pairings that bring a burst of flavor and texture to your meal.
- Fresh Guacamole: This creamy avocado dip adds richness and balances the crispy chalupa with its smooth texture and zesty lime flavor.
- Spicy Salsa: A tangy, vibrant salsa, whether pico de gallo or roasted, complements the chalupa’s crispy shell and savory toppings.
- Mexican Street Corn: Enjoy this elote-style dish with cotija cheese and chili powder for a sweet and spicy side that enhances your meal’s overall flavor.
- Crispy Tortilla Chips: Crunchy and perfect for scooping, these chips invite more salsa or guacamole, making them a great addition that everyone loves.
- Refreshing Cucumber Salad: A light, crisp salad with sliced cucumbers, tomatoes, and a splash of lime can cut through the richness of the chalupa and keep it fresh.
- Chilled Mexican Beer: A cold cerveza pairs beautifully with these chalupas, offering a refreshing counterpart to the flavors that excite the palate.
- Traditional Horchata: This sweet, cinnamon-infused rice beverage cools down the spices and enhances the overall experience, making it a classic winner.
- Churros for Dessert: End the meal on a sweet note with these fried pastries dusted in cinnamon sugar, providing a delightful contrast to your savory main dish.
- Spicy Jalapeño Poppers: For those craving a kick, these cheesy, stuffed peppers add another layer of heat and flavor to the dinner table.
- Creamy Coleslaw: A tangy and crunchy slaw adds a refreshing contrast that complements the warm, crispy chalupa beautifully while enhancing texture.
Homemade Chalupa Recipe FAQs
What kind of flour should I use for the chalupa shells?
You can use all-purpose flour as the main ingredient for the chalupa bread. However, for a healthier twist, I recommend substituting 50% of the all-purpose flour with whole wheat flour. This gives a nuttier flavor and a denser texture while still maintaining the delightful crispiness.
How do I store leftover chalupa shells?
Store leftover chalupa shells in an airtight container at room temperature for up to 2 days. To keep them fresh for longer, you can refrigerate them for up to a week. Just be sure to reheat them in the oven at 350°F to restore their crunchiness before serving.
Can I freeze the dough for homemade chalupa?
Absolutely! You can freeze the prepared dough for up to 3 months. Wrap the dough tightly in plastic wrap and then in aluminum foil to prevent freezer burn. When you’re ready to use it, simply thaw in the fridge overnight and then proceed with the frying instructions. This makes for a quick meal option on busy days!
What should I do if my chalupa shells don’t puff while frying?
If your shells don’t puff, it might be because the oil isn’t hot enough. To check the temperature, drop a small piece of dough into the oil; if it bubbles vigorously, it’s ready. Fry each shell for about 1 minute until golden brown, and remember not to overcrowd the pan to maintain the temperature.
Are there any dietary considerations for the homemade chalupa?
Yes! To cater to various diets, you can create vegetarian or vegan options. Use plant-based butter and sour cream substitutes to make the recipe entirely vegan. If you have allergies, be mindful of any cheese or beans you choose to include, as some individuals may be sensitive to dairy or legumes. Always serve with care to avoid cross-contamination for allergic guests.
How long can I keep leftover cooked chalupas?
Leftover cooked chalupas are best enjoyed fresh, but if you have some leftovers, you can store them in an airtight container in the refrigerator for about 3 to 4 days. Before serving again, reheating in an oven helps revive their crispiness!
Delightful Homemade Chalupa That's Better Than Taco Bell
Ingredients
Equipment
Method
- In a large mixing bowl, combine 2 cups of all-purpose flour, 1 teaspoon baking powder, and 1/2 teaspoon salt. Add 2 tablespoons of melted butter and pour in 3/4 cup of milk. Mix until a soft dough forms, ensuring there are no dry spots. Knead the dough lightly on a floured surface for about 2 minutes until smooth, then cover and let it rest for 15-20 minutes.
- After resting, divide the dough into 15 equal portions. Roll each piece into a ball, then flatten into a 5-inch circle using a rolling pin. Prick each circle with a fork multiple times. Heat a deep skillet with about 2 inches of oil over medium heat.
- Carefully place one dough circle in the hot oil. Fry for approximately 1 minute or until it begins to float and puff up. Using tongs, gently fold the chalupa in half while frying, maintaining the shell shape. Fry for an additional minute until golden brown and crispy.
- Remove from the oil and drain on paper towels. Repeat for the remaining dough circles, ensuring the oil temperature is maintained.
- Prepare your toppings while the chalupa shells cool slightly. Drain black beans and warm them over medium heat. Chop lettuce and tomatoes into bite-sized pieces. Set out bowls of sour cream, queso sauce, and shredded cheese.
- Fill each chalupa shell with a layer of warm black beans, followed by lettuce, diced tomatoes, sour cream, and queso sauce. Optionally sprinkle cheese on top. Serve your homemade chalupas immediately.
Leave a Reply