
As I unwrapped a piece of delicious candy yesterday, nostalgia washed over me like a warm blanket on a chilly night. Those simple, sweet moments of childhood came rushing back, and I couldn’t help but crave something reminiscent of those classic Bullseye candies—the delightful Vanilla Cream Filled Caramels. This recipe is a perfect way to channel that childhood joy into your kitchen, bringing a luxurious homemade candy experience that’s both fun to make and absolutely satisfying to enjoy. With a creamy vanilla center encased in rich, chewy caramel, they’re not only great for sharing during the holidays but also perfect for gifting to loved ones. And the best part? You won’t need any specialized skills; this recipe is straightforward and rewarding, ensuring that everyone can whip up their own little piece of nostalgia. Ready to dive into some sweet memory-making? Let’s get started!
Why try these filled caramels?
Nostalgic Treat: These vanilla cream filled caramels transport you back to your childhood, evoking memories of classic candies.
Easy to Make: There’s no need for fancy skills to create these chewy delights; just simple ingredients and straightforward steps make a winning treat.
Gift-Worthy: Perfect for sharing with friends and family, they add a personal touch to any holiday gathering or special occasion. Try pairing them with homemade Pumpkin Cream Cheese or enjoy alongside some Apple Cider Caramel.
Customizable Flavors: Mix it up! Experiment with different flavor extracts to create unique versions of this classic recipe.
Luxurious Textures: Indulge in the rich layers—soft caramel outside and a creamy, sweet center for the ultimate sensory experience!
Vanilla Cream Filled Caramel Ingredients
• Get ready to whip up your own nostalgic treats!
For the Caramel
- Unsalted Butter – Adds richness and creaminess to the caramel; ensure it’s at room temperature for easy incorporation.
- Brown Sugar – Provides sweetness and depth; you can choose light or dark brown sugar for different molasses notes.
- Salt – Enhances the flavor profile and balances the sweetness; use sea salt for a gourmet touch.
- Evaporated Milk – Contributes to the caramel’s creamy texture; can be substituted with condensed milk for a sweeter version.
- Heavy Cream – Adds richness and a smoother consistency; substitute with half-and-half if you prefer lower fat content.
- Corn Syrup – Prevents crystallization; alternatives include glucose syrup or tapioca syrup.
For the Vanilla Cream Filling
- Powdered Sugar – Sweetens and gives structure to the filling; sifting before use can prevent clumping.
- Vegetable Shortening – Stabilizes the cream filling; can be swapped with coconut oil for a unique flavor.
- Vanilla Extract – Imparts classic flavor; use pure vanilla extract for the best taste.
These ingredients are your ticket to creating delectable vanilla cream filled caramels that will bring joy to your kitchen and evoke sweet memories!
Step‑by‑Step Instructions for Nostalgic Vanilla Cream Filled Caramels
Step 1: Prepare Caramel Base
In a thick-bottomed pot, combine ½ cup unsalted butter, 1 cup brown sugar, ¼ teaspoon salt, 1 cup evaporated milk, ½ cup heavy cream, and ½ cup corn syrup. Cook over medium-low heat, stirring continuously until the butter melts and the sugar dissolves. Watch for a bubbly surface, then increase the heat to medium and bring the mixture to a gentle boil, about 5 minutes.
Step 2: Cook to Temperature
Raise the heat to medium-high and continue to cook the caramel mixture, stirring constantly, until it reaches 241°F on a candy thermometer or the soft ball stage. This process may take 10-15 minutes, and you’ll notice a thickening texture and rich caramel color when it’s almost ready. Be attentive, as the sugar can easily burn if left unattended.
Step 3: Cool Caramel
Once the caramel reaches the desired temperature, carefully pour it onto a prepared baking tray lined with parchment paper. Use a spatula to spread the mixture into a uniform 10″x16″ rectangle. Allow the caramel to cool completely at room temperature for about 30 minutes, ensuring it becomes firm enough to cut without losing shape.
Step 4: Make Vanilla Cream
While the caramel cools, prepare the vanilla cream filling. In a mixing bowl, combine 1 cup vegetable shortening with 2 cups powdered sugar, mixing well until fluffy. Gradually add 2 tablespoons vanilla extract and 1 tablespoon corn syrup. Incorporate water, one tablespoon at a time, until the mixture resembles a thick yet spreadable play-doh consistency.
Step 5: Assemble Caramels
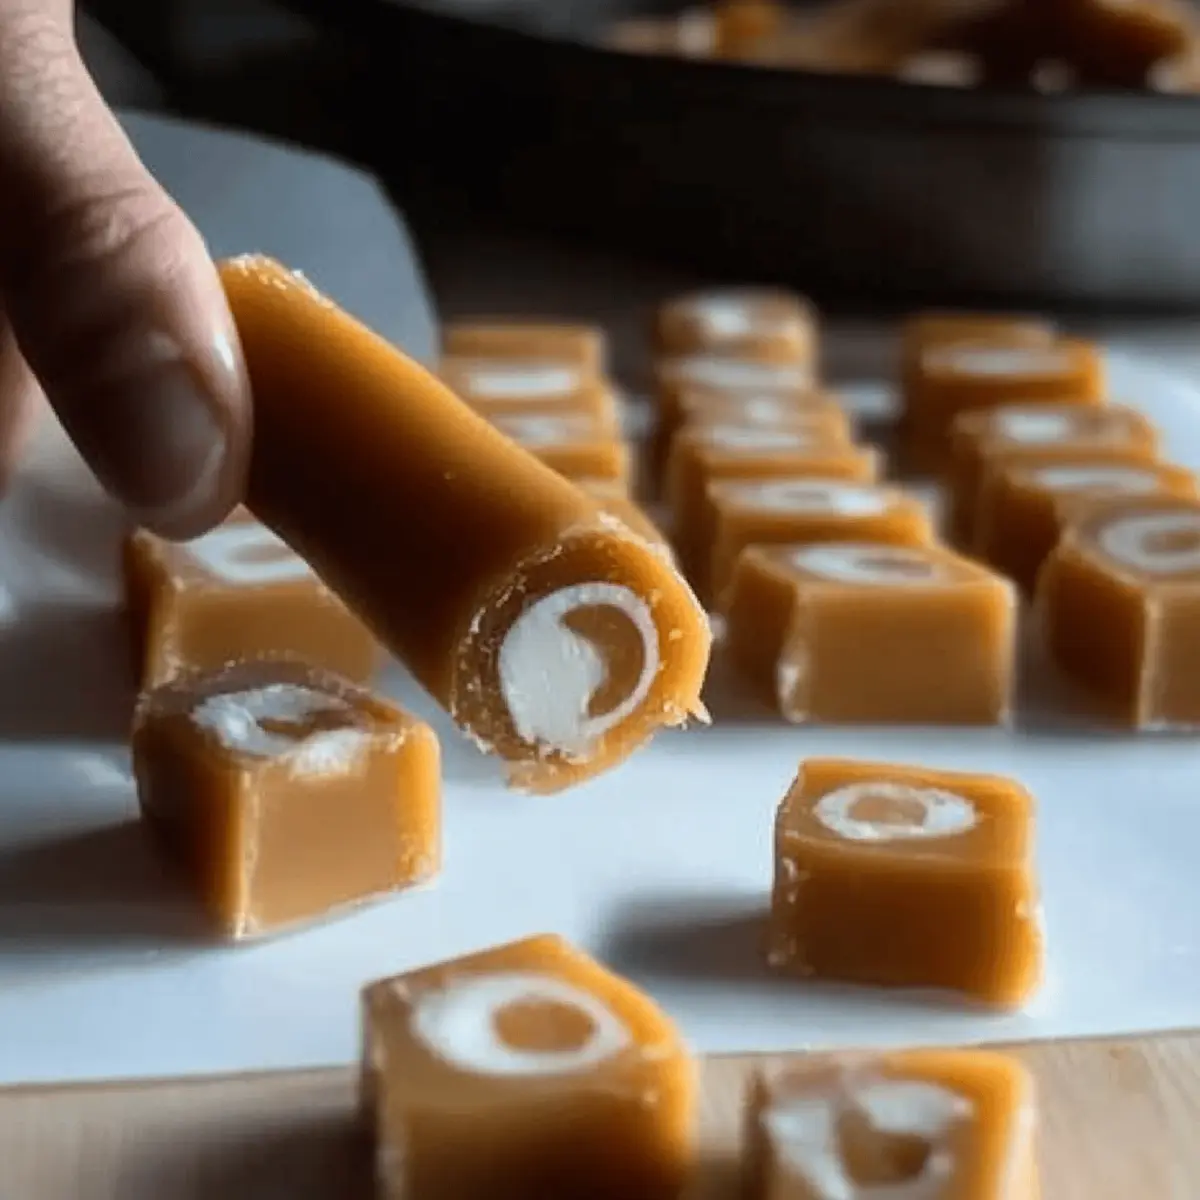
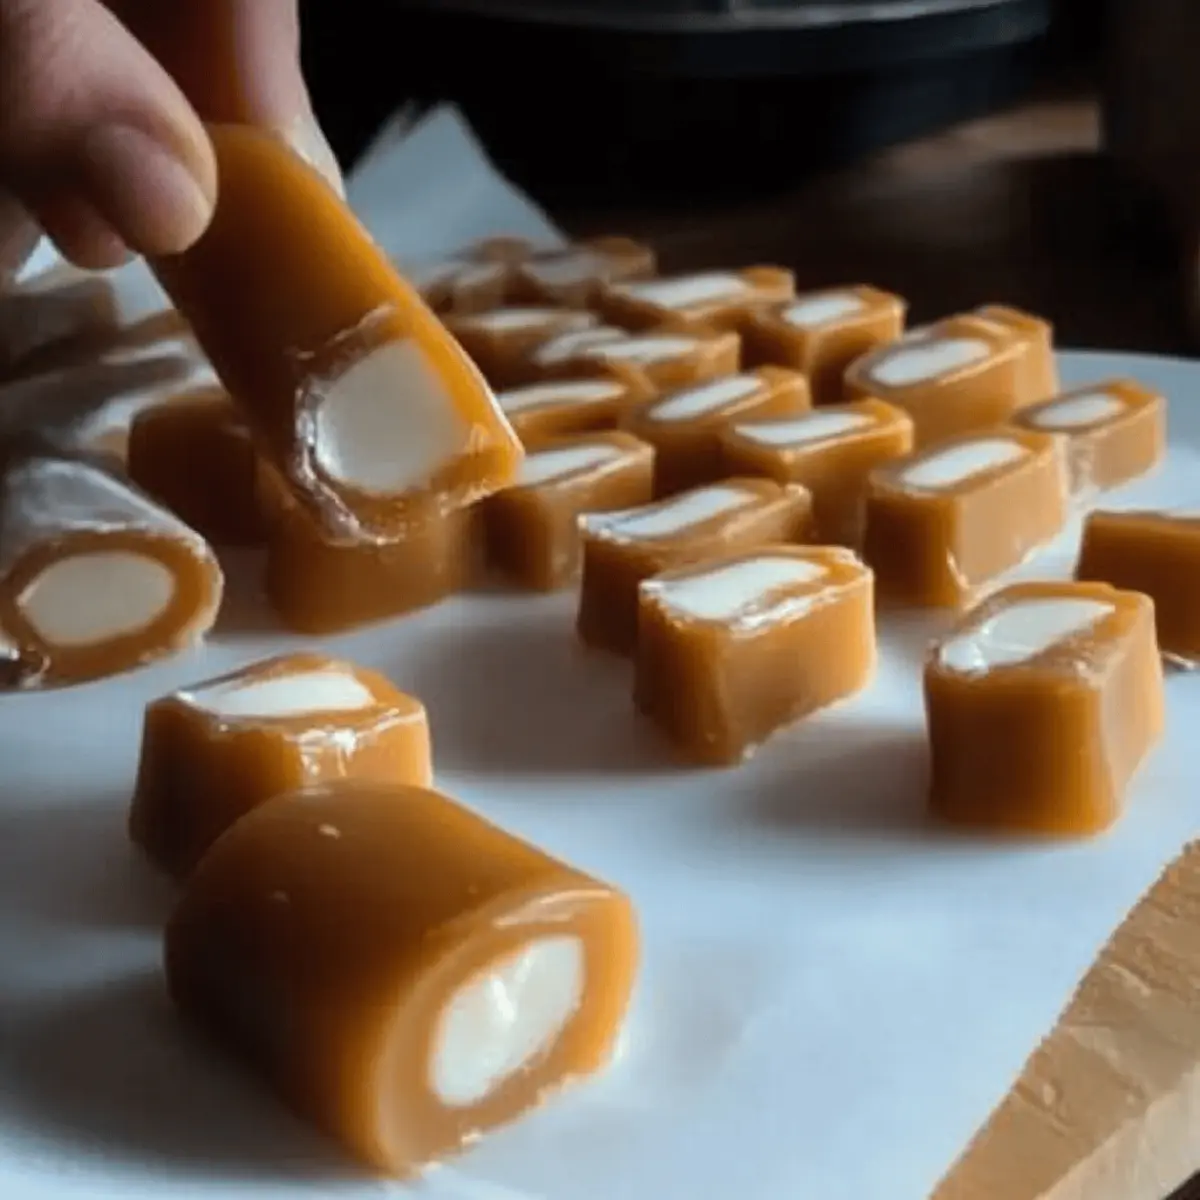
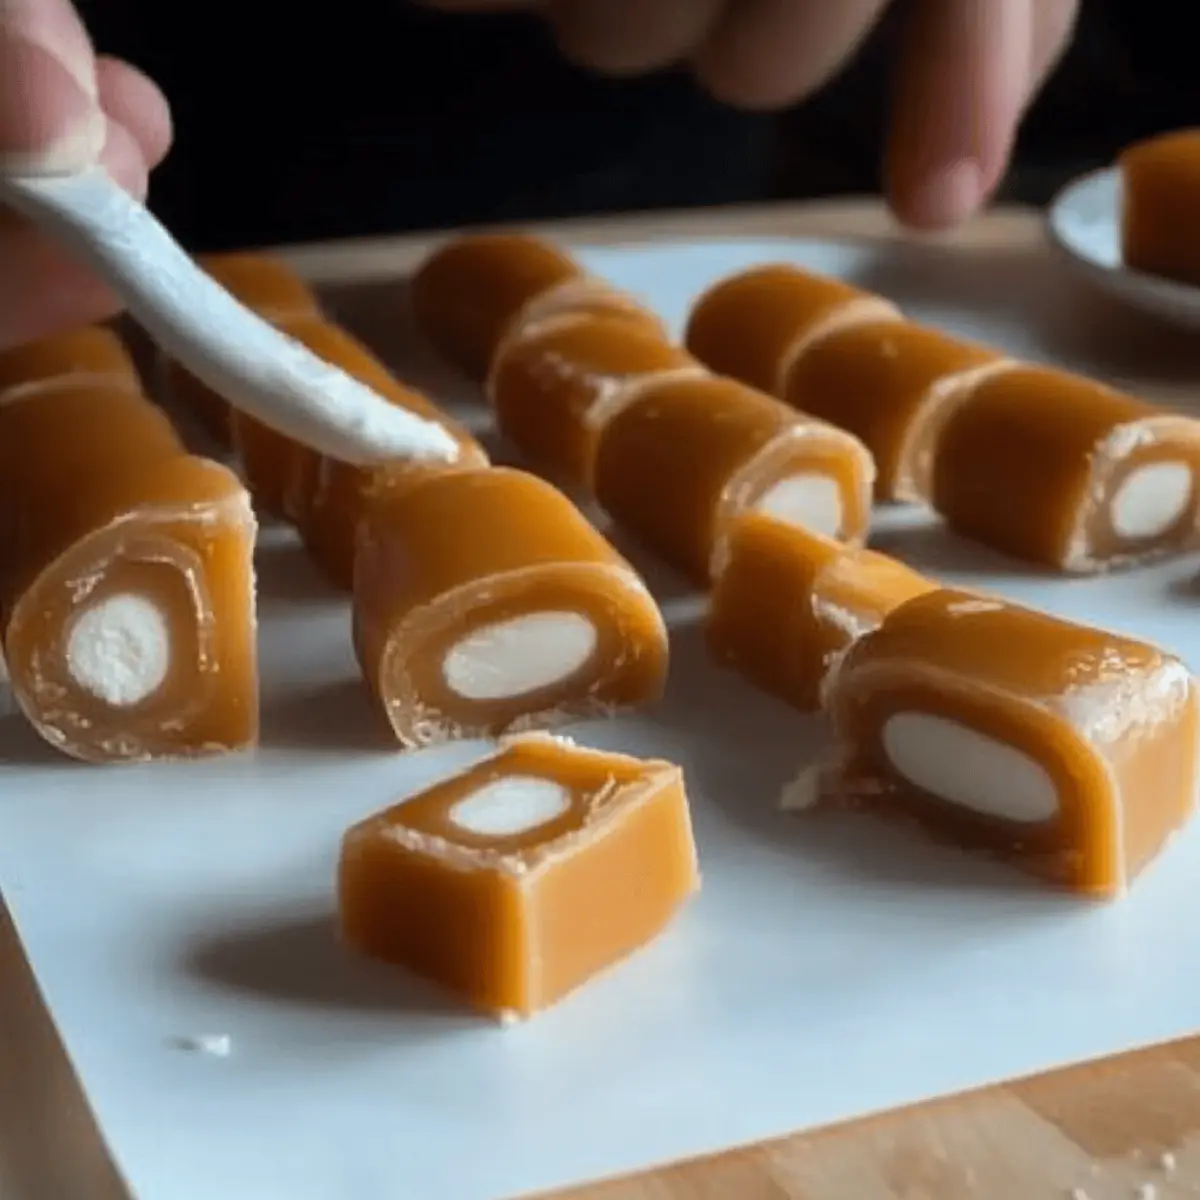
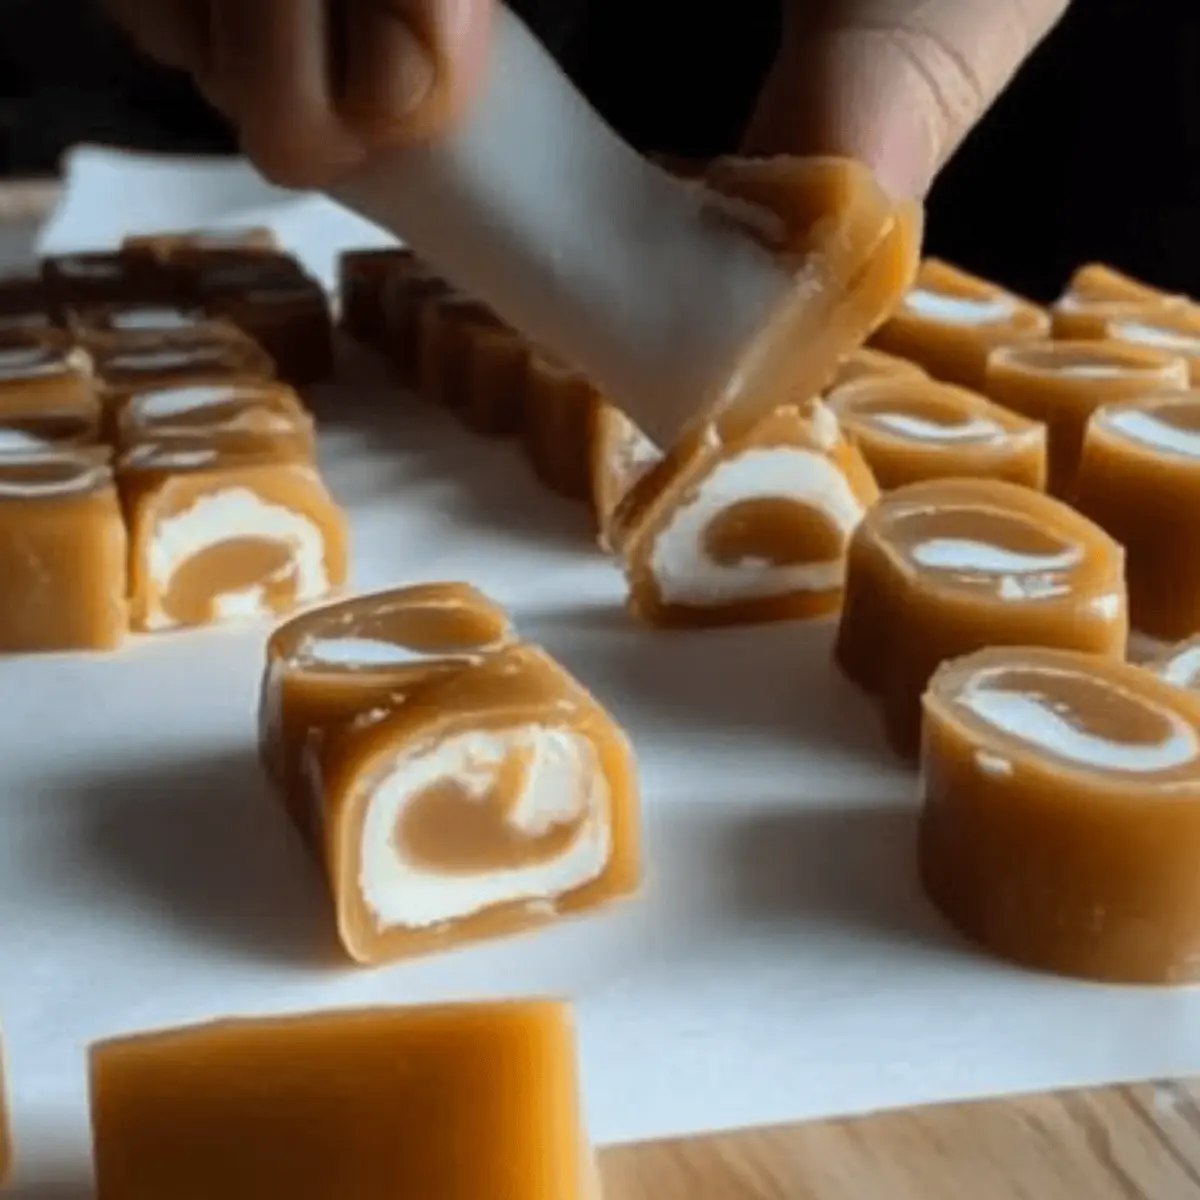
Once the caramel is cool, cut the slab into four equal pieces. Spread a thin layer of the vanilla cream filling over each piece, leaving a ½-inch border around the edges. Roll each piece tightly into logs, pressing gently as you shape until the seam is smooth and seamless, creating irresistible vanilla cream filled caramels.
Step 6: Slice and Wrap
With the logs formed, use a sharp knife to cut them into ½-inch slices. To avoid sticking, warm your knife in hot water and clean it with cooking spray if needed. Wrap each slice securely in cello wrap or parchment paper to keep them fresh for gifting or enjoying later, and savor your unique vanilla cream filled caramels!
Make Ahead Options
These delectable vanilla cream filled caramels are perfect for busy home cooks looking to save time! You can prepare the caramel base up to 24 hours in advance; simply cook and cool it as instructed, then wrap it tightly in plastic wrap and refrigerate. The vanilla cream filling can also be made ahead, keeping it fresh in the fridge for up to 3 days—just ensure it’s stored in an airtight container to maintain its creamy texture. When you’re ready to assemble, roll out the cooled caramel, spread the creamy filling, and cut into slices. This way, you can enjoy homemade candy on your schedule, evoking sweet nostalgia with every bite!
What to Serve with Nostalgic Vanilla Cream Filled Caramels
Indulge in the sweetness of your homemade caramels by pairing them with deliciously complementary dishes that elevate the experience.
-
Creamy Hot Chocolate: The rich cocoa and velvety milk create a heavenly match with the sweet, chewy caramels, providing warmth and nostalgia with every sip.
-
Fresh Fruit Platter: Bright, juicy fruits like strawberries and citrus balance the sweetness of the caramels, adding a refreshing contrast that awakens the palate.
-
Espresso or Dark Roast Coffee: The bold and robust flavors of coffee cut through the sweetness, making each bite of caramel even more delightful.
-
Chocolate Sauce Drizzle: A generous drizzle of chocolate sauce transforms your caramels into a decadent dessert, enhancing both texture and flavor for chocolate lovers.
-
Salted Caramel Brownies: Pair your creamy caramels with rich, fudgy brownies topped with a sprinkle of sea salt for an indulgent dessert that’s hard to resist.
-
Homemade Whipped Cream: Light, fluffy whipped cream adds a luxurious touch when dolloped alongside the caramels, creating a delightful sweet-and-creamy experience.
-
Nutty Biscotti: Crunchy biscotti, especially almond or hazelnut, provide a delicious textural contrast and a nutty flavor that complements the caramel perfectly.
-
Vanilla Ice Cream: A scoop of vanilla ice cream offers a creamy base for enjoying your caramels, making for a delightful and nostalgic dessert combo.
-
Spiced Mulled Cider: The warm spices in mulled cider bring out the cozy notes of the caramels, creating a comforting pairing that’s perfect for festive gatherings.
How to Store and Freeze Vanilla Cream Filled Caramels
Room Temperature: Keep the caramels in a cool, dry place for up to 1 week, stored in a single layer, separated by parchment paper to prevent sticking.
Fridge: For extended freshness, refrigerate the wrapped caramels. They can last up to 2 weeks, but ensure they’re airtight to maintain their chewy texture.
Freezer: To freeze, wrap the caramels tightly in plastic wrap and place them in an airtight container. They’ll keep well for up to 3 months; just thaw at room temperature before enjoying.
Reheating: If the caramels harden, gently warm them in the microwave for a few seconds to regain their soft, luxurious texture.
Expert Tips for Vanilla Cream Filled Caramels
-
Use a Candy Thermometer: Accurate temperature readings ensure your vanilla cream filled caramels achieve the perfect texture, avoiding hard or tacky results.
-
Watch for Sugar Burning: Stay vigilant during cooking. Sugar can go from perfect to burnt in moments, ruining your caramel batch if unattended.
-
Cool Completely: Allow your caramel to cool thoroughly to prevent a mushy center when rolling; a firm structure is key for easy assembly.
-
Warm Your Knife: For clean cuts, warm your knife in hot water and then clean it with cooking spray. This trick reduces sticking and gives you neat slices.
-
Sift the Powdered Sugar: Sifting prevents clumping in your vanilla cream filling, ensuring a smooth and velvety texture that’s simply delightful.
-
Experiment with Flavors: Don’t hesitate to customize! Try adding different flavored extracts or spices to your cream for a unique twist on these nostalgic treats.
Vanilla Cream Filled Caramel Variations
Dive into these delightful twists on classic vanilla cream filled caramels that will elevate your candy-making experience.
-
Almond Extract: Substitute vanilla extract with almond extract for a nutty flavor that adds a sophisticated touch to your caramels.
-
Peppermint Twist: Add a few drops of peppermint extract for a seasonal spin, perfect for holiday treats that will refresh your taste buds.
-
Spiced Cream: Incorporate ground cinnamon or nutmeg into the vanilla cream filling for a warm, aromatic kick that dances on your palate.
-
Nutty Surprise: Fold in finely chopped hazelnuts or walnuts into the vanilla cream for a delightful crunch that enhances the overall texture.
-
Chocolate Drizzle: After slicing, drizzle melted dark or white chocolate over the caramels for an added touch of decadence and eye-catching presentation.
For a seasonal indulgence, make these alongside Pumpkin Cream Cheese treats and share the joy! Each caramel offers a bit of nostalgia with a dash of creativity, making your homemade gifts truly one-of-a-kind.
-
Fruit Flavor: Swap out the vanilla for citrus extracts like orange or lemon for a vibrant, tangy kick that brightens each bite.
-
Salted Caramel: Sprinkle a pinch of flaky sea salt over the cooled caramels for a sweet-and-salty contrast that enhances the depth of flavors.
Enjoy the process of customizing these delicious confections and let your creativity shine as you create your delightful varieties!
Vanilla Cream Filled Caramels Recipe FAQs
What is the best way to select ingredients for my caramels?
Absolutely! For the best results, choose unsalted butter that is soft at room temperature for easy incorporation. Look for brown sugar that has a moist, sandy texture; avoid any that feels hard or crumbly, as it indicates staleness. When selecting vanilla extract, opt for pure rather than imitation for a richer flavor.
How should I store my filled caramels?
To store your delicious vanilla cream filled caramels, keep them at room temperature in a cool, dry place. I recommend placing them in a single layer, separated by sheets of parchment paper to prevent sticking. They will last for about 1 week when stored this way. For longer preservation, consider refrigerating them, where they can stay fresh for up to 2 weeks.
Can I freeze my caramels, and how?
Very! To freeze your caramels, begin by wrapping each piece tightly in plastic wrap. Then, place the wrapped caramels in an airtight container or a freezer-safe bag. They can be stored in the freezer for up to 3 months. When you’re ready to enjoy them, simply thaw at room temperature for a few hours, and they’ll be as delightful as ever!
What should I do if my caramel doesn’t set properly?
If your caramel is too soft, it may not have reached the correct temperature during cooking. Reheat the caramel gently while stirring, and use a candy thermometer to ensure it hits 241°F (soft ball stage). If it’s too firm, you can melt it down again with a bit of evaporated milk and stir until you achieve the desired consistency.
Are there any dietary considerations I should be aware of?
Definitely! These caramels contain dairy and are quite high in sugar, so they’re best enjoyed in moderation. If you’re making them for someone with dietary restrictions, consider using dairy-free margarine and a non-dairy milk alternative to substitute for the heavy cream and evaporated milk. Always check the ingredient labels for potential allergens, especially for items like shortening or flavored extracts.
How should I reheat caramels if they’ve hardened?
If your caramels have become a bit too firm, that’s easily rectified! Place them in the microwave for just a few seconds—start with 5-10 seconds on low heat—keeping a close eye to avoid overheating. Alternatively, you can set them near a warm oven for a few minutes, allowing them to soften slightly while retaining their delightful texture.
Decadent Vanilla Cream Filled Caramel for Sweet Nostalgia
Ingredients
Equipment
Method
- In a thick-bottomed pot, combine the unsalted butter, brown sugar, salt, evaporated milk, heavy cream, and corn syrup. Cook over medium-low heat, stirring continuously until butter melts and sugar dissolves. Increase heat and bring to a gentle boil, about 5 minutes.
- Raise heat to medium-high and continue to cook, stirring constantly, until temperature reaches 241°F or the soft ball stage (about 10-15 minutes).
- Carefully pour caramel onto a prepared baking tray lined with parchment paper and spread into a uniform rectangle. Allow to cool completely for about 30 minutes.
- While caramel cools, prepare vanilla cream filling by mixing vegetable shortening and powdered sugar until fluffy. Gradually add vanilla extract and corn syrup, incorporating water one tablespoon at a time until thick and spreadable.
- Cut cooled caramel slab into four equal pieces. Spread vanilla cream filling on each piece, leaving a ½-inch border. Roll each piece tightly into logs.
- Cut logs into ½-inch slices with a warm knife for neat cuts. Wrap each slice in cello wrap or parchment paper.
Leave a Reply