
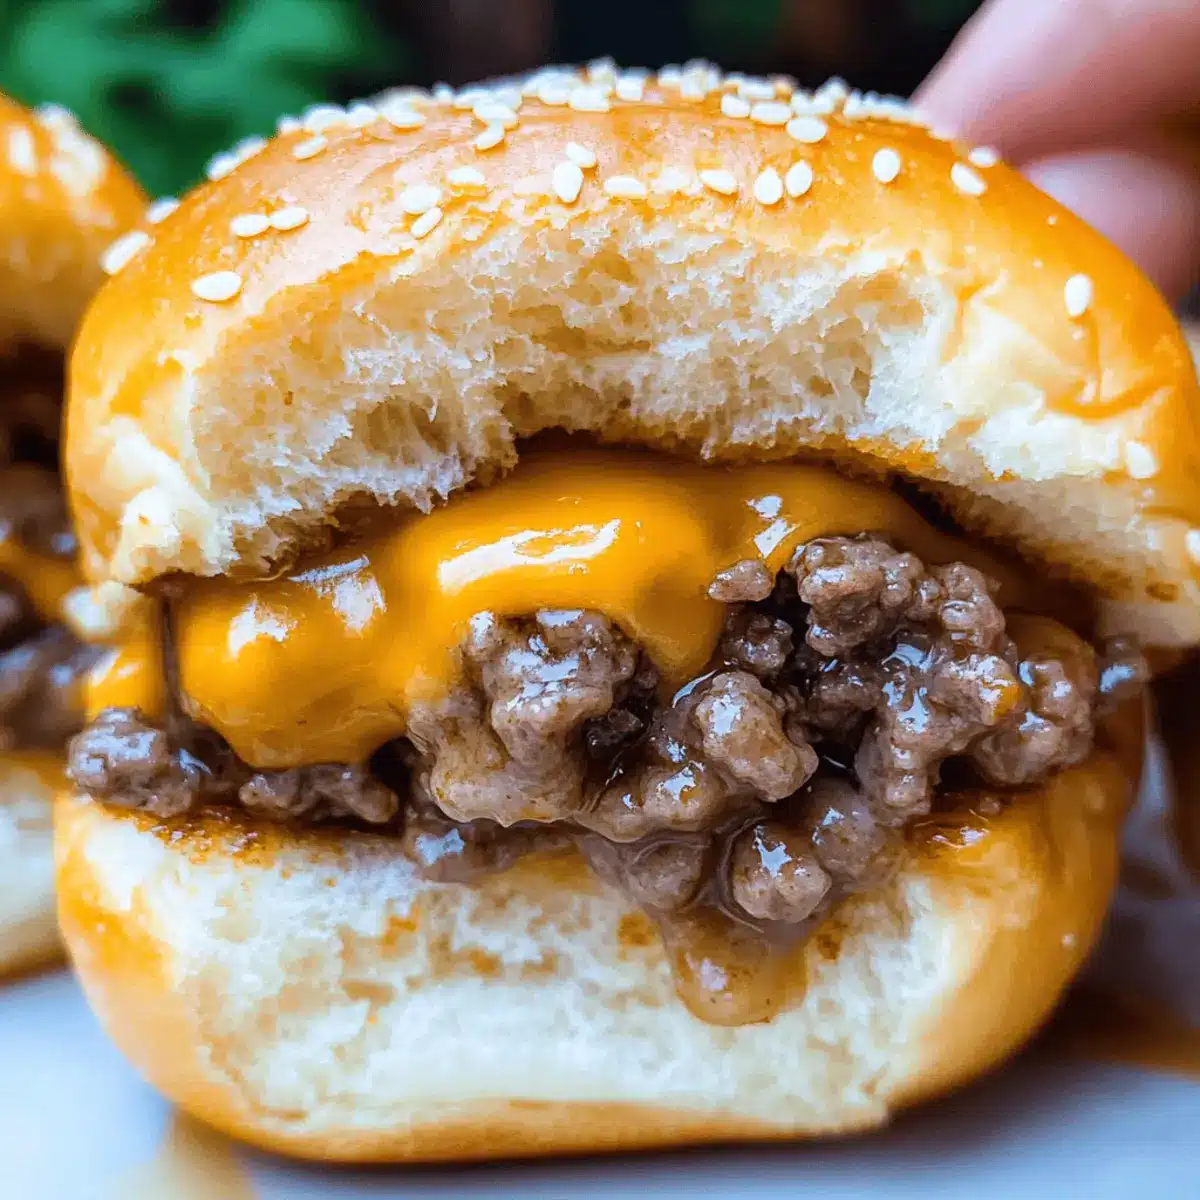
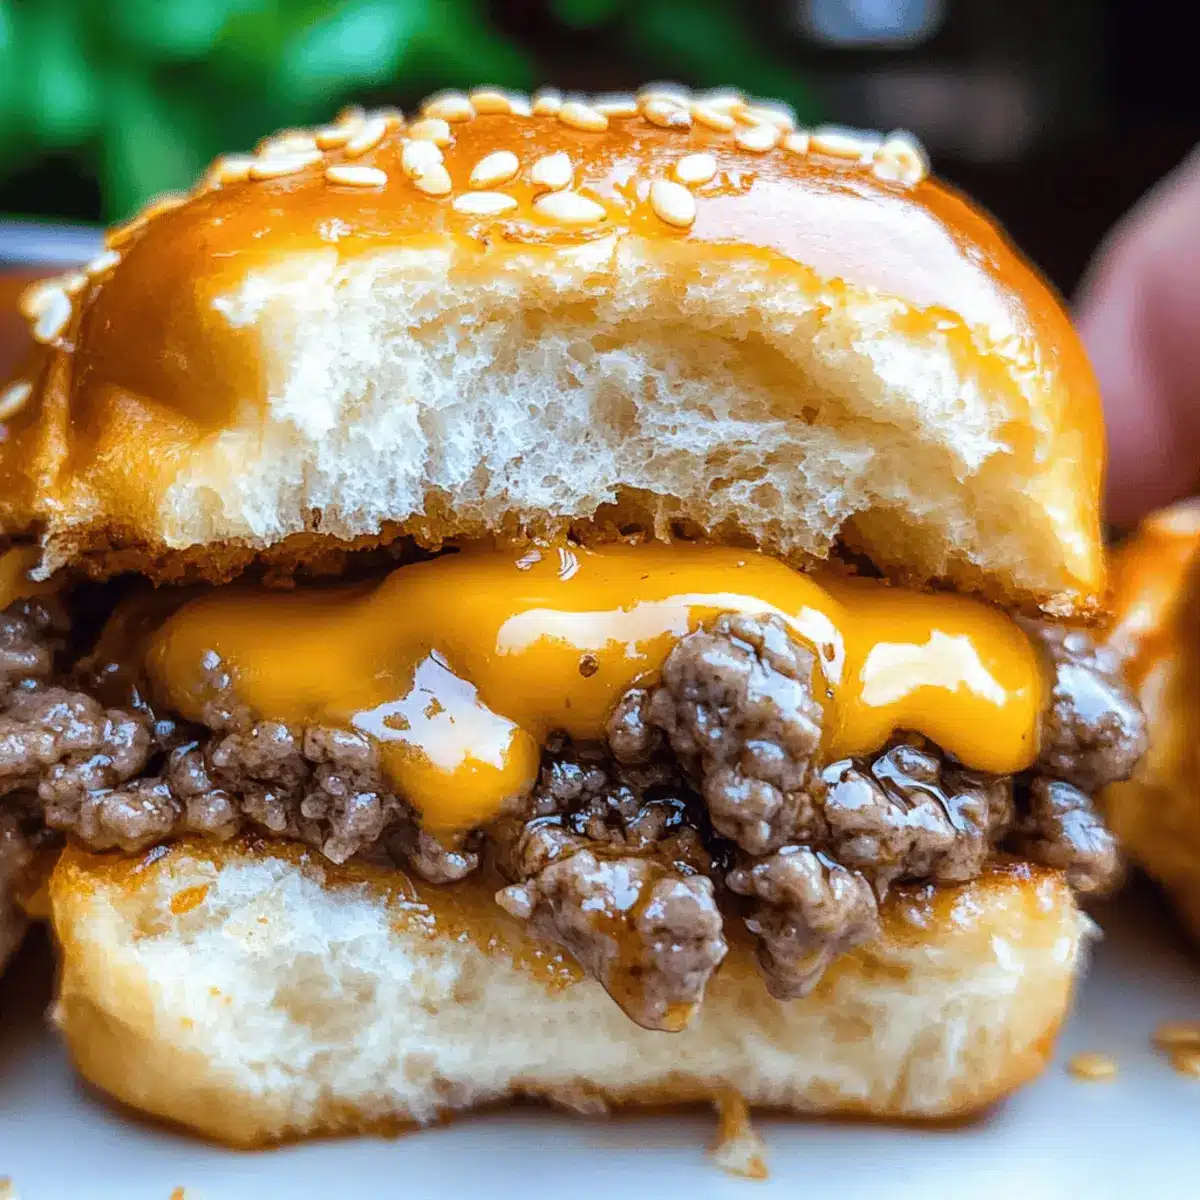
As a warm aroma fills the kitchen, I’m reminded of joyful gatherings where comfort food takes center stage. Enter my 30-Minute Cheeseburger Sliders with Hawaiian Rolls—bite-sized wonders that promise to elevate any occasion, from game day to a cozy weeknight dinner. With just 30 minutes of prep, these sliders are a lifesaver for those of us who crave homemade goodness but are short on time. They strike the perfect balance of savory goodness and melty cheese, all enveloped in those soft, slightly sweet rolls. Best of all, they’re a guaranteed crowd-pleaser that will have both kids and adults coming back for seconds. Curious about how to make these delightful bites at home? Let’s dive into the recipe!

Why You’ll Love These Sliders
Simplicity Done Right: The recipe is designed for easy preparation, needing just 30 minutes for that perfect game-day snack or family dinner.
Crowd-Pleaser: With gooey cheese and savory beef in every bite, these sliders are sure to win over everyone at your table, reminiscent of your favorite Cheeseburger Soup Cozy!
Versatile Options: Feel free to get creative by swapping in different cheeses or customizing the beef mixture with herbs for a unique twist.
Make-Ahead Friendly: Assemble sliders beforehand and store them in the fridge or freezer for a quick, homemade delight whenever you need.
Perfect Texture: Enjoy the golden, crispy tops that lead to pillowy-soft insides, creating a delightful mouthfeel with every satisfying bite!
Cheeseburger Sliders with Hawaiian Rolls Ingredients
For the Sliders
- Olive Oil – Adds moisture and aids cooking; can use vegetable oil as a substitute.
- Lean Ground Beef (10% fat or medium ground beef) – Provides the primary protein source with great flavor; avoid extra-lean beef to prevent dryness, or substitute with ground turkey or chicken.
- Onion – Adds flavor and sweetness to the beef mixture; consider using dried onion soup mix or flakes if you’re short on fresh onions.
- Mayonnaise – Contributes creaminess and richness; you can use either regular or light varieties.
- BBQ Sauce – Enhances flavor with a hint of sweetness; ketchup can serve as a substitute if needed.
- Garlic Powder – Provides savory depth; fresh minced garlic can be a delicious alternative.
- Kosher Salt and Black Pepper – Essential for seasoning; adjust according to your taste preferences.
For the Glaze
- Butter – Glazes the tops for a rich finish; you can substitute with olive oil if preferred.
- Dijon Mustard – Adds a touch of tanginess to the glaze; regular mustard works as well.
- Brown Sugar – Offers a sweet balance that complements the glaze flavor; you can swap with maple syrup if you’re looking for a natural sweetener.
- Sesame Seeds or Everything Bagel Seasoning – Provides garnish that adds texture and visual appeal; feel free to skip this step if you prefer.
For the Base
- Hawaiian Rolls (12 count) – Serve as a sweet and soft base for the sliders; mini brioche or potato rolls can be used in place of Hawaiian rolls.
- Cheddar Cheese (8 slices or 6-8 oz shredded) – Melts beautifully, adding creaminess and flavor; consider experimenting with provolone or fontina for a different cheese experience.
Step‑by‑Step Instructions for Cheeseburger Sliders with Hawaiian Rolls
Step 1: Preheat the Oven
Begin by preheating your oven to 350°F (177°C). While it’s heating, line a baking sheet with parchment paper or lightly grease it with oil to prevent sticking. This simple preparation will ensure that your Cheeseburger Sliders with Hawaiian Rolls bake evenly and come out perfectly golden.
Step 2: Sauté the Onions
In a large skillet, heat a splash of olive oil over medium heat. Once hot, add finely chopped onions and sauté for about 5-6 minutes, or until they’re golden and fragrant. Stir occasionally to avoid burning. This step adds a wonderful sweetness and depth to your cheeseburger sliders.
Step 3: Cook the Ground Beef
Next, add the lean ground beef to the skillet with the cooked onions. Using a spatula, break the beef into smaller pieces and cook for about 3 minutes, or until it’s nicely browned. Drain any excess grease to keep your sliders juicy but not oily.
Step 4: Mix the Ingredients
Add creamy mayonnaise, BBQ sauce, garlic powder, and a pinch of kosher salt and black pepper to the beef mixture. Stir everything together until it’s well combined, letting the flavors meld nicely. Taste and adjust seasoning if necessary, ensuring that your mixture is packed with flavor.
Step 5: Assemble the Sliders
With your Hawaiian rolls still connected, slice them in half horizontally. Place the bottom half on the prepared baking sheet. Layer a slice of cheese, add a generous amount of the beef mixture, followed by another slice of cheese, then cover with the top half of the rolls. This stacking makes for perfectly cheesy Cheeseburger Sliders.
Step 6: Prepare the Glaze
In a small bowl, combine melted butter, Dijon mustard, and brown sugar. Mix well until smooth. Brush this flavorful glaze generously over the tops of the assembled rolls, and sprinkle with sesame seeds or everything bagel seasoning for that final touch of texture and flavor.
Step 7: Bake the Sliders
Carefully place the assembled sliders in the preheated oven, baking uncovered for 12-15 minutes. Look for the tops to become golden brown and the cheese to melt beautifully. This will ensure your cheeseburger sliders are warm and enticing when served.
Step 8: Serve and Enjoy
Once baked, allow the sliders to cool slightly before cutting them into individual portions, making it easier for everyone to grab one. Serve these warm Cheeseburger Sliders with Hawaiian Rolls at your next gathering or cozy dinner, and watch them disappear in no time!

Make Ahead Options
These Cheeseburger Sliders with Hawaiian Rolls are perfect for meal prep enthusiasts! You can assemble the sliders up to 24 hours ahead of time by preparing the beef and cheese layers in advance, then simply cover them tightly and refrigerate. If you’re looking for an even longer hold, you can freeze the assembled sliders for up to 3 months—make sure to wrap them well in plastic wrap and store them in an airtight container to maintain quality. When it’s time to serve, just bake straight from the refrigerator (add a couple of extra minutes to baking time) or thaw overnight in the fridge before baking. You’ll enjoy the same juicy, flavorful sliders without the last-minute stress!
Cheeseburger Sliders with Hawaiian Rolls Variations
Feel free to get creative and make this recipe your own, transforming it into something even more delightful!
-
Cheese Choices: Explore different types of cheese like mozzarella, pepper jack, or gouda for a flavorful twist. Each cheese brings its unique character, enhancing the overall taste of your sliders.
-
Herbed Beef: Introduce a burst of freshness by adding chopped herbs like parsley or oregano to the beef mixture. This little addition will elevate the flavor profile and make the sliders taste extra special.
-
Different Rolls: Swap the Hawaiian rolls for garlic knots or mini brioche for a different textural experience. Or, if you’re looking to lighten your meal, consider using lettuce wraps as a low-carb option.
-
Spicy Kick: Add jalapeños or crushed red pepper flakes to the beef mixture to bring some heat to your sliders. These little bursts of spice will keep your taste buds excited and engaged!
-
BBQ Variations: Experiment with different BBQ sauces or even a chipotle mayo for a smoky flavor kick! The smoky and sweet compositions will add complexity while keeping the beloved BBQ element intact.
-
Veggie Delight: Incorporate shredded zucchini or finely chopped bell peppers into the beef mixture. This not only enhances the flavor but also adds more vegetables for a healthy twist.
-
Sweet Glaze: Instead of brown sugar, brush the tops with a mixture of honey and Dijon mustard. It creates a sweet yet tangy glaze that gives your sliders a brilliant flavor boost akin to my Chocolate Zucchini Bread!
-
Saucy Sliders: Serve the sliders with a side of dipping sauces—think ranch, blue cheese, or a spicy aioli. Providing an array of sauces can enhance the slider experience and cater to different taste preferences.
With these variations, you’ll be able to cater to every palate and make your Cheeseburger Sliders a true reflection of your culinary creativity!
Expert Tips for Cheeseburger Sliders
-
Grease Management: Spoon off excess grease from the beef after cooking to prevent soggy sliders. This keeps the bread fluffy and delicious!
-
Sharp Knife Use: Utilize a serrated knife to cut through the baked Hawaiian rolls easily, ensuring perfect slices without squishing your sliders.
-
Make Ahead Magic: Assemble your cheeseburger sliders a day in advance, cover, and refrigerate. Just pop them in the oven when you’re ready to serve!
-
Taste Check: Always taste your beef mixture before assembling. Adjust the seasonings because the flavor depends significantly on the balance of salt and pepper!
-
Even Baking: Ensure that your sliders are evenly spaced on the baking sheet to avoid steaming, which helps achieve that desirable crispy top.
How to Store and Freeze Cheeseburger Sliders
- Room Temperature: Cheeseburger sliders are best enjoyed fresh, but if left uncovered, they should not sit out for more than 2 hours to ensure food safety.
- Fridge: Store leftover sliders in an airtight container for up to 3 days. Reheat in the oven at 350°F (177°C) until warmed through for the best texture.
- Freezer: For longer storage, freeze assembled but unbaked sliders for up to 3 months. Wrap tightly in plastic wrap and foil. Bake from frozen, adding a few extra minutes to the cooking time.
- Reheating: Reheat thawed sliders in the oven for about 10-15 minutes at 350°F (177°C) to restore their deliciousness and melty cheese!
What to Serve with Cheeseburger Sliders with Hawaiian Rolls
As you prepare to delight family and friends with these irresistible sliders, consider complementing them with sides that heighten the comforting, savory experience.
-
Crispy Sweet Potato Fries: The sweetness of these fries balances the rich sliders, adding a delightful crunch and beautiful color to your plate. Dunking them in a zesty dipping sauce enhances the fun!
-
Classic Coleslaw: This refreshing dish provides a creamy, tangy contrast, perfectly cutting through the savory flavors of the cheeseburger sliders. It’s a crunchy, colorful addition that’s always a crowd favorite at gatherings.
-
Tomato Basil Soup: Warm and comforting, a bowl of this soup is the perfect partner for your sliders. The velvety texture and herby notes elevate each bite, while the warmth feels like a cozy hug.
-
Garden Salad: A vibrant medley of greens and fresh veggies brings brightness to your meal. Drizzled with a light vinaigrette, it adds a refreshing crunch alongside those indulgent sliders.
-
Pickle Platter: Serve an assortment of pickles for a tangy bite that cuts through the flavors of the cheeseburger sliders with Hawaiian rolls. The acidity nicely complements the rich, savory flavors.
-
Soda or Craft Beer: Toast to flavor with a fizzy soda or a crafted beer that pairs beautifully with the savory richness of your sliders. The bubbles cleanse the palate and enhance the overall dining experience.
Cheeseburger Sliders with Hawaiian Rolls Recipe FAQs
What type of ground beef should I use for the sliders?
Absolutely! For the best flavor and juiciness, I recommend using lean ground beef (10% fat) or medium ground beef (20% fat). Avoid extra-lean options as they can lead to dryness. If you’re looking for alternatives, ground turkey, chicken, or even plant-based substitutes can work beautifully, bringing their unique flavors to the mix!
How should I store leftover cheeseburger sliders?
Leftover sliders can be refrigerated for up to 3 days. Make sure to keep them in an airtight container to maintain their freshness. When you’re ready to enjoy them again, reheat in the oven at 350°F (177°C) for about 10-15 minutes until warmed through and the cheese is delightful and melty again!
Can I freeze cheeseburger sliders? If so, how?
Yes, you can absolutely freeze your cheeseburger sliders! Assemble them but do not bake. Wrap the prepared sliders tightly in plastic wrap and then in foil, or place them in a freezer-safe bag. They will stay good for up to 3 months. When you’re ready to bake them, simply cook from frozen, adding an extra 5-10 minutes to the original baking time. It’s an easy make-ahead solution!
What can I do if the sliders become soggy?
If you find that your cheeseburger sliders are turning out soggy, one effective tip is to spoon off any excess grease from the beef mixture after cooking. This prevents moisture from making the bread too soft. Also, ensure that your sliders are evenly spaced on the baking sheet when baking; this promotes even cooking and crispy tops!
Are these sliders suitable for a gluten-free diet?
If you need to cater to gluten-free diets, you can easily adapt this recipe! Simply swap out the Hawaiian rolls for gluten-free slider buns or even lettuce wraps for a low-carb option. And be sure to use gluten-free sauces where necessary, like BBQ sauce and mustard, to keep it safe for those with gluten sensitivities.
Can I use different types of cheese for the sliders?
Very! The beauty of these cheeseburger sliders is the flexibility with cheese choice. While cheddar is a classic, you might want to try mozzarella, pepper jack for a spicy kick, or provolone for a smooth melt. Experiment with different cheeses to find your favorite combination!
Savory Cheeseburger Sliders with Hawaiian Rolls in 30 Minutes
Ingredients
Equipment
Method
- Preheat your oven to 350°F (177°C) and prepare a baking sheet.
- Heat olive oil in a skillet and sauté chopped onions until golden, about 5-6 minutes.
- Add ground beef to the skillet and cook until browned, about 3 minutes, draining excess grease.
- Stir in mayonnaise, BBQ sauce, garlic powder, salt, and pepper until combined.
- Layer cheese and beef mixture on the bottom half of the sliced rolls, then cover with the top half.
- Mix melted butter, Dijon mustard, and brown sugar in a bowl and brush over the rolls.
- Bake sliders in the preheated oven for 12-15 minutes until golden brown and melty.
- Allow to cool slightly before cutting and serve warm.
Leave a Reply