
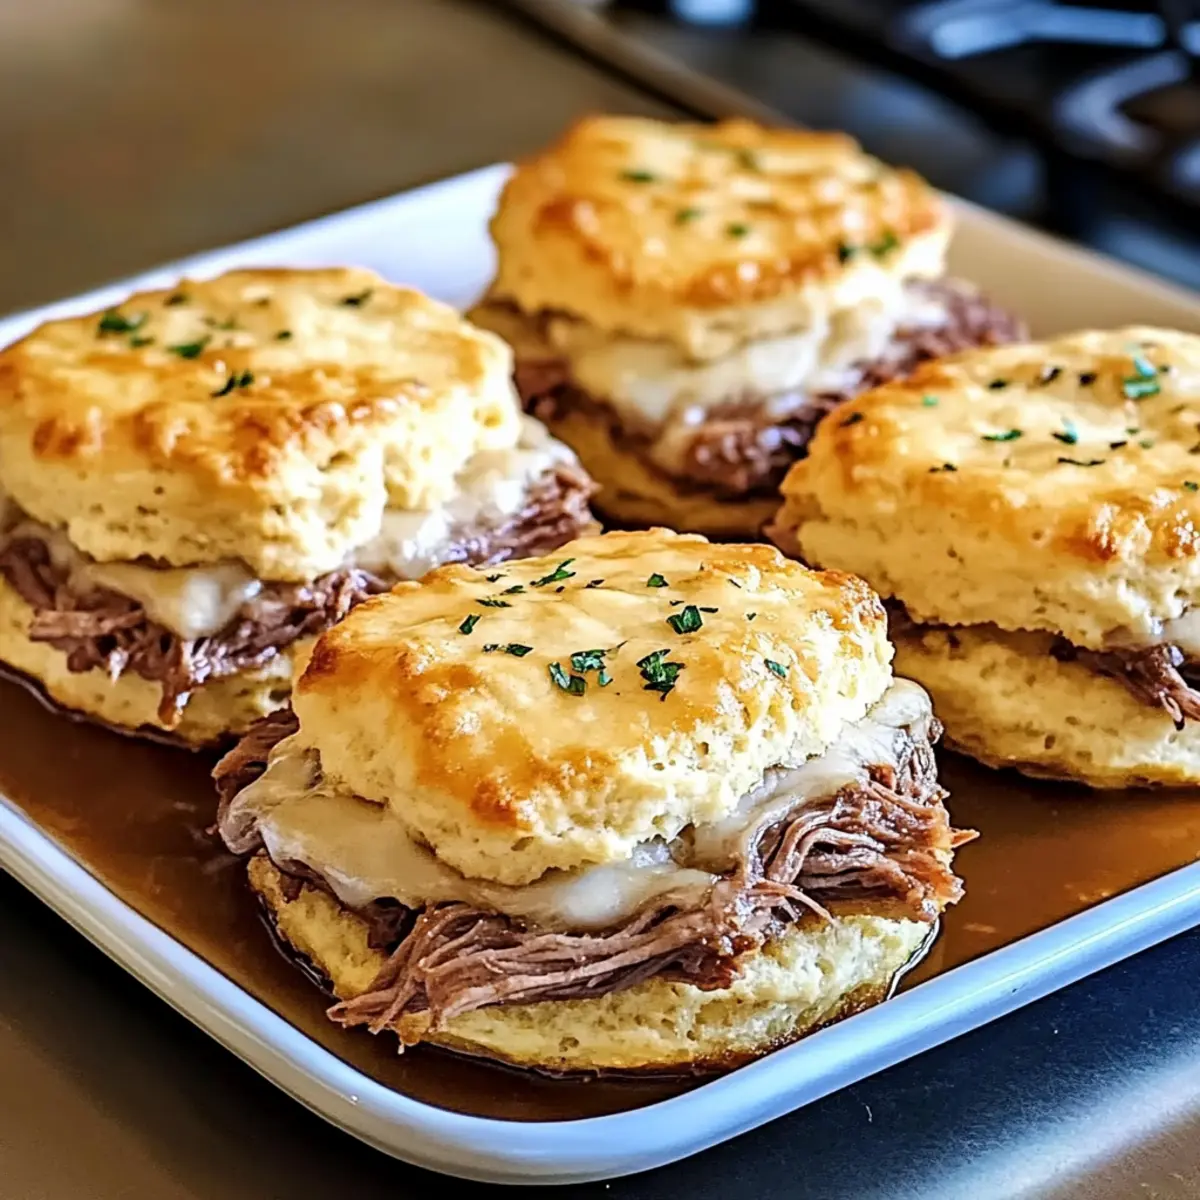
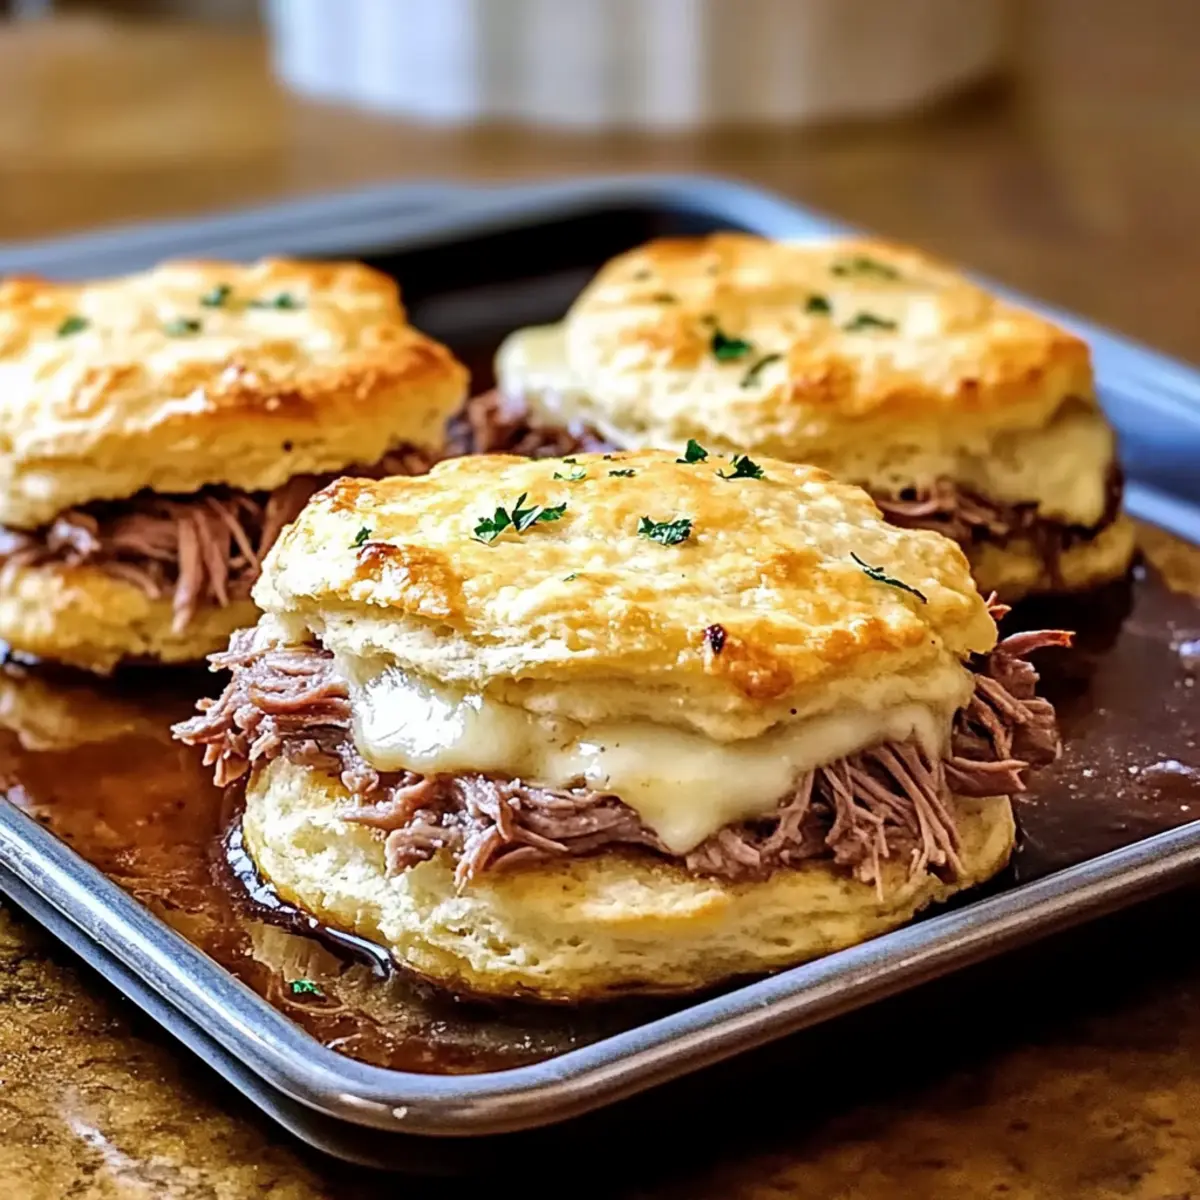
As I savored the last bite of my brother’s roast beef sandwich, inspiration struck me—a comforting twist on an old classic. That’s how these Baked French Dip Biscuits came to life! This easy recipe combines flaky biscuits with savory roast beef and melted cheese, making it a fantastic option for family meals or when entertaining friends. Not only are these biscuits delightfully simple to whip up, but they also bring that cozy, heartwarming comfort food vibe every home cook dreams of. Perfect for busy weeknights or relaxed gatherings, each bite is a warm hug for your taste buds. Ready to elevate your dinner table? Let’s dive into this delicious adventure!

Why are Baked French Dip Biscuits a Must-Try?
Comfort Food Redefined: Baked French Dip Biscuits merge the joy of flaky biscuits with savory roast beef and cheesy goodness. Simplicity is Key: This easy recipe makes it perfect for weeknight dinners or family gatherings without complicating your kitchen time. Crowd-Pleaser: With flavors that appeal to everyone, they’re bound to be a hit at your next meal. Versatile Options: Feel free to swap in different proteins or cheeses, or try adding sautéed onions for extra flavor. Time-Saving Delight: Ready in about 30 minutes, these biscuits let you serve up comfort food without hours of prep.
Baked French Dip Biscuits Ingredients
Note: To create your own delectable Baked French Dip Biscuits, gather these essential ingredients for a truly comforting feast!
-
For the Biscuit Base
-
Buttermilk Biscuits – They provide the soft, flaky foundation; feel free to use store-bought if you’re short on time!
-
For the Filling
-
Good-quality Roast Beef – This adds savory flavor and protein; opt for thinly sliced pieces for easy wrapping.
-
Melted Cheese (Swiss or Provolone) – These cheeses contribute a creamy texture; cheddar is a great substitution.
-
For Dipping
-
Au Jus – This enhances the flavor and complements the biscuits; while store-bought is convenient, homemade is always fresher!
Let’s bring this recipe to life and dive into the delightful world of Baked French Dip Biscuits!
Step‑by‑Step Instructions for Baked French Dip Biscuits Recipe
Step 1: Preheat the Oven
Begin by preheating your oven to 425°F (220°C). This temperature ensures the biscuits will bake perfectly, achieving a golden-brown crust. While the oven warms up, gather your baking sheet and parchment paper, ready to transform your kitchen into a warm, inviting space filled with delightful aromas.
Step 2: Prepare the Biscuit Dough
If you’re making homemade buttermilk biscuits, roll out the dough on a floured surface until it’s about 1/2 inch thick. Use a round cutter to cut out circles, or simply flatten your store-bought biscuits. Aim for uniform shapes to ensure even baking. These biscuits will serve as a cozy envelope for the savory filling.
Step 3: Assemble the Filling
Lay each biscuit round on your prepared baking sheet. Place a slice of roast beef on the center of each biscuit, followed by a generous portion of melted cheese. Ensure you don’t overload them, as you want the biscuits to wrap easily around the filling, forming delightful Baked French Dip Biscuits.
Step 4: Seal the Biscuits
Gently fold the edges of each biscuit over the filling, pinching them tightly to seal in the savory roast beef and gooey cheese. This step is crucial to prevent any delicious leaks while baking. As you work, keep your hands slightly floured to maintain a smooth dough texture during sealing.
Step 5: Bake the Biscuits
Once your biscuits are tightly sealed, place the baking sheet in the preheated oven. Bake them for about 25 minutes, or until they are puffed and golden brown. Keep an eye on their color, as a lovely golden crust will indicate they’re ready to come out and be enjoyed.
Step 6: Serve with Au Jus
After baking, allow the Baked French Dip Biscuits to cool for a few minutes on a wire rack. Serve them warm with a side of au jus for dipping, enhancing each bite with rich, mouthwatering flavors. They are best enjoyed fresh, maximizing the comfort food experience!
Baked French Dip Biscuits Recipe Variations
Elevate your culinary creativity by personalizing this comforting dish with endless delicious possibilities.
-
Chicken Swap: Replace roast beef with shredded chicken for a lighter, yet still satisfying option. It’s a delightful twist that brings a whole new dynamic to the dish!
-
Cheese Change: Try switching out Swiss or provolone cheese for sharp cheddar or creamy gouda to enhance the flavor palette. Each cheese brings a unique richness that’s sure to please.
-
Veggie Boost: Add sautéed onions or bell peppers for extra flavor and texture. This simple addition can transform your biscuits into a savory feast bursting with vibrant tastes.
-
Spicy Kick: Mix in jalapeños or a dash of hot sauce into the filling to heat things up. Perfect for those who crave a bit of spice in their comfort food!
-
Herb Infusion: Incorporate fresh herbs like thyme or rosemary into the biscuit dough for an aromatic layer of flavor. It elevates each bite with a delightful freshness.
-
Mini Biscuit Bites: Scale down to make bite-sized versions for parties or gatherings. Just adjust the baking time to ensure they remain golden and fluffy!
-
Make-Ahead Magic: Prepare the biscuits ahead of time by assembling them and storing in the fridge before baking. This will save you time during busy evenings or when guests arrive!
If you’re looking to try something uniquely delicious with your family meals, these creative variations can take your Baked French Dip Biscuits to heartwarming new heights. For a delightful side, consider pairing them with a light salad or another satisfying dish that balances the meal.
How to Store and Freeze Baked French Dip Biscuits
Fridge: Store leftover Baked French Dip Biscuits in an airtight container for up to 3 days to maintain their freshness and flavor.
Freezer: For longer storage, wrap individual biscuits tightly in plastic wrap or aluminum foil and freeze for up to 2 months. This way, you can enjoy them at a later date!
Reheating: When ready to eat, reheat biscuits directly from the freezer in a preheated oven at 350°F (175°C) for about 15-20 minutes, or until warmed through and crispy.
Enjoying Later: To preserve the taste and texture, it’s best to reheat in the oven rather than using a microwave, which can make them soggy.
What to Serve with Baked French Dip Biscuits?
Elevate your comfort food experience with delightful sides and accompaniments that perfectly complement the warm, savory flavors of these heavenly bites.
- Crisp Green Salad: A light, refreshing salad adds essential crunch and vibrant flavors, balancing the rich, savory biscuits. Toss in your favorite vinaigrette for an extra zing!
- Garlic Butter Veggies: Roasted seasonal vegetables drizzled with garlic butter offer a savory side packed with nutrients and delicious flavors. The buttery richness pairs beautifully with the biscuits.
- Classic Coleslaw: This tangy, crunchy side dish provides a refreshing contrast to the hearty biscuit filling, adding texture and a burst of flavor that brightens your plate.
- Sweet Potato Fries: Crispy, slightly sweet fries offer a delightful contrast to the savory biscuits, creating a satisfying combination that everyone will love.
- Spicy Pickles: A side of spicy pickles adds a zesty kick that cuts through the richness of beef and cheese, enhancing the whole meal experience.
- Au Jus Dipping Sauce: Don’t forget the homemade or quality store-bought au jus! This warm, flavorful sauce is essential for dipping your biscuits, enhancing their rich flavor profile.
- Red Wine: A glass of smooth red wine elevates the meal, harmonizing with the deliciousness of the roast beef and cheese for a more sophisticated touch at dinner.
- Dessert: Chocolate Chip Cookies: End on a sweet note with warm, gooey chocolate chip cookies. Their comforting sweetness wraps up the meal perfectly!
Expert Tips for Baked French Dip Biscuits
-
Ingredient Quality: Use the best quality roast beef and cheese for maximum flavor impact in your Baked French Dip Biscuits recipe. This makes a noticeable difference in taste.
-
Dough Sealing: Ensure you pinch the edges tightly to prevent leakage. A good seal keeps the savory filling inside, providing a delightful burst of flavor with every bite.
-
Chill Before Baking: Refrigerate assembled biscuits for about 15 minutes before baking. This allows the dough to firm up and helps them maintain their shape.
-
Baking Sheet Preparation: Line your baking sheet with parchment paper to prevent sticking and ensure easy cleanup. This will help maintain the perfect golden crust on your biscuits.
-
Storage Solutions: Store leftovers in an airtight container for up to 3 days. Reheat in the oven for the best texture, as microwaving can make them soggy.
Make Ahead Options
These Baked French Dip Biscuits are perfect for busy home cooks looking to save time without sacrificing flavor! You can prepare the components—like rolling out the biscuits and assembling the roast beef and cheese filling—up to 24 hours in advance. Simply refrigerate the prepared biscuits (covered with plastic wrap) overnight. When you’re ready to serve, preheat your oven and bake for about 25 minutes until golden brown. This method ensures your biscuits maintain their flaky texture and savory filling remains intact, delivering just as delicious results! With this prep, you can enjoy hearty comfort food with minimal last-minute effort.
Baked French Dip Biscuits Recipe FAQs
What type of roast beef should I use for the filling?
I recommend using good-quality roast beef that is thinly sliced, as it ensures easy wrapping inside the biscuit. Look for lean cuts without too much fat, which can add unnecessary greasiness. Deli meats can work in a pinch, but homemade or freshly roasted beef delivers the best flavor.
How long can I store Baked French Dip Biscuits in the refrigerator?
You can store leftover Baked French Dip Biscuits in an airtight container in the refrigerator for up to 3 days. Just make sure they are properly sealed to maintain their moisture and flavor. For the best experience, reheat them in the oven instead of the microwave to keep the texture crisp.
Can I freeze Baked French Dip Biscuits? How do I do it?
Absolutely! To freeze, wrap each biscuit tightly in plastic wrap or aluminum foil and place them in a freezer-safe bag. They can be kept for up to 2 months. When you’re ready to enjoy them, reheat straight from the freezer in a preheated oven at 350°F (175°C) for about 15-20 minutes, until heated through and crispy.
What should I do if my biscuits leak during baking?
If your biscuits leak while baking, it could be due to not sealing the edges tightly enough. Make sure to pinch the seams firmly when assembling the biscuits. If you find that your dough is a bit slippery, dust your hands with a little flour while sealing to help create a good connection. If leaks happen, don’t worry; they’ll still taste delicious!
Are there any dietary considerations for Baked French Dip Biscuits?
This recipe contains wheat and dairy, which may not be suitable for those with gluten intolerance or lactose sensitivity. You can swap traditional ingredients for gluten-free biscuit mixes and dairy-free cheese alternatives to make it more inclusive. Always double-check ingredient labels if you’re accommodating allergies, especially with processed items like au jus.
Can pets enjoy any leftovers?
While the roast beef may be appealing to your furry friends, be cautious! Avoid giving them remnants if they contain cheese or au jus, as these can upset their stomachs. If you do share some plain roast beef without seasoning, it can be a special treat, but always consult your vet first if unsure!

Baked French Dip Biscuits Recipe for Irresistible Comfort
Ingredients
Equipment
Method
- Preheat the oven to 425°F (220°C).
- Prepare the biscuit dough by rolling it out or flattening store-bought biscuits.
- Assemble the filling by laying roast beef and cheese on each biscuit.
- Seal the biscuits by folding the edges tightly around the filling.
- Bake in the preheated oven for about 25 minutes until golden brown.
- Serve warm with au jus for dipping.
Leave a Reply