
As I walked through the pumpkin patch last week, the air was filled with the delightful scent of autumn leaves and the faint hint of cinnamon. It got me thinking about one of my favorite seasonal treats: Halloween Cake Pops. These festive delights are not just a feast for the eyes; they combine fudgy cake crumbles with creamy frosting, all wrapped in colorful candy melts. Whether you’re hosting a spooky soirée or looking for a fun activity to do with the kids, these customizable cake pops are perfect for adding joy to your Halloween festivities. Plus, they’re a fantastic way to channel your creativity and make memories with loved ones in the kitchen. Ready to create some charm and sweetness that’s both edible and fun? Let’s dive into making these spooktacular treats!
Why Love Halloween Cake Pops?
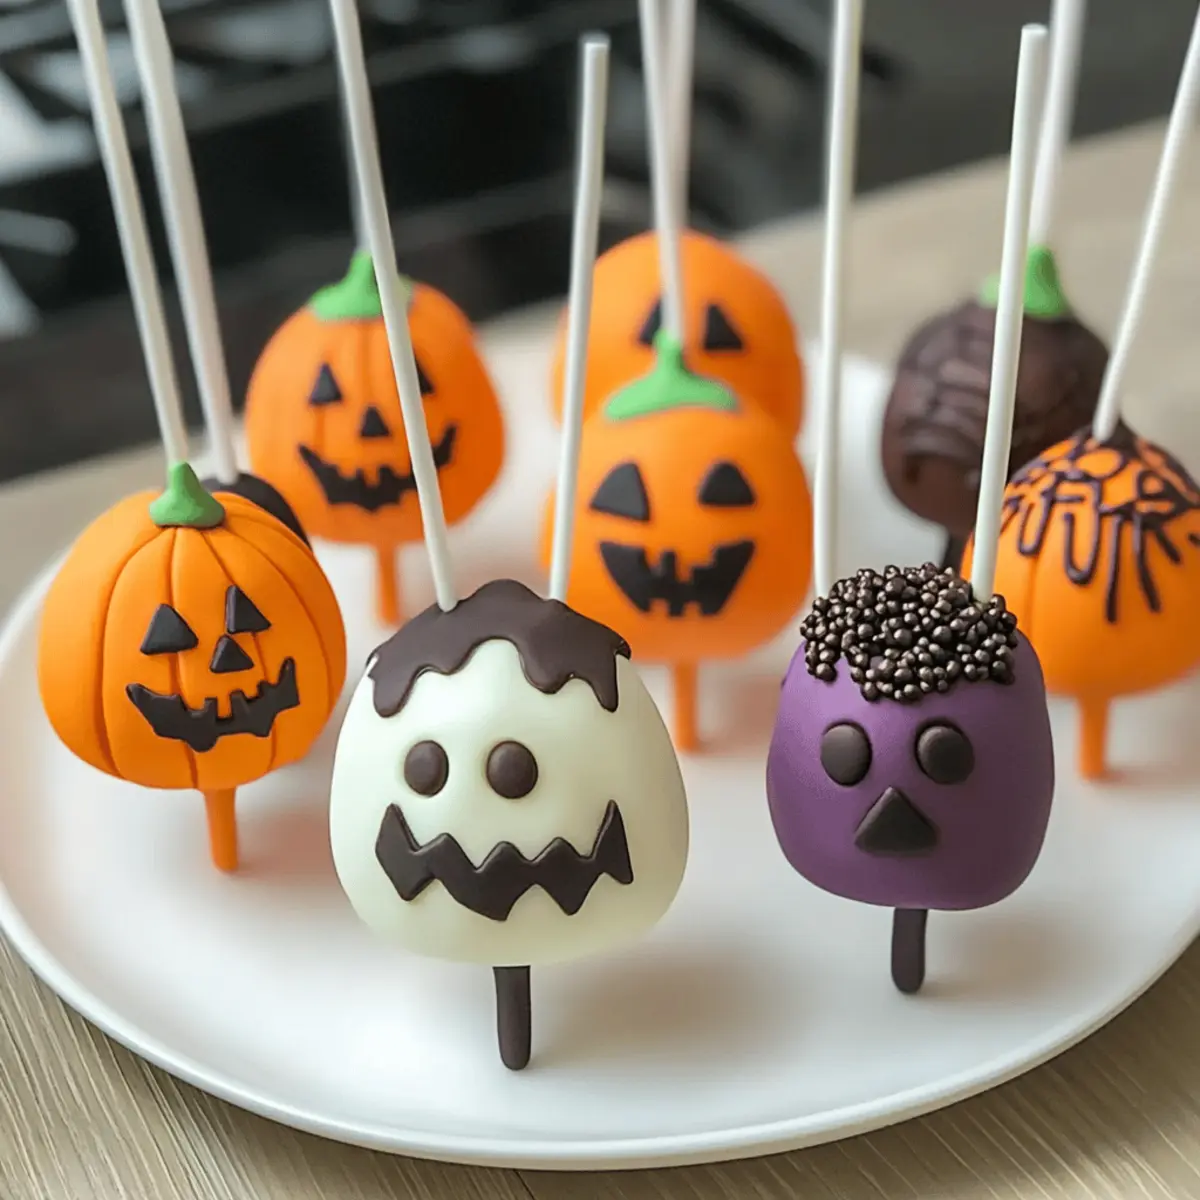
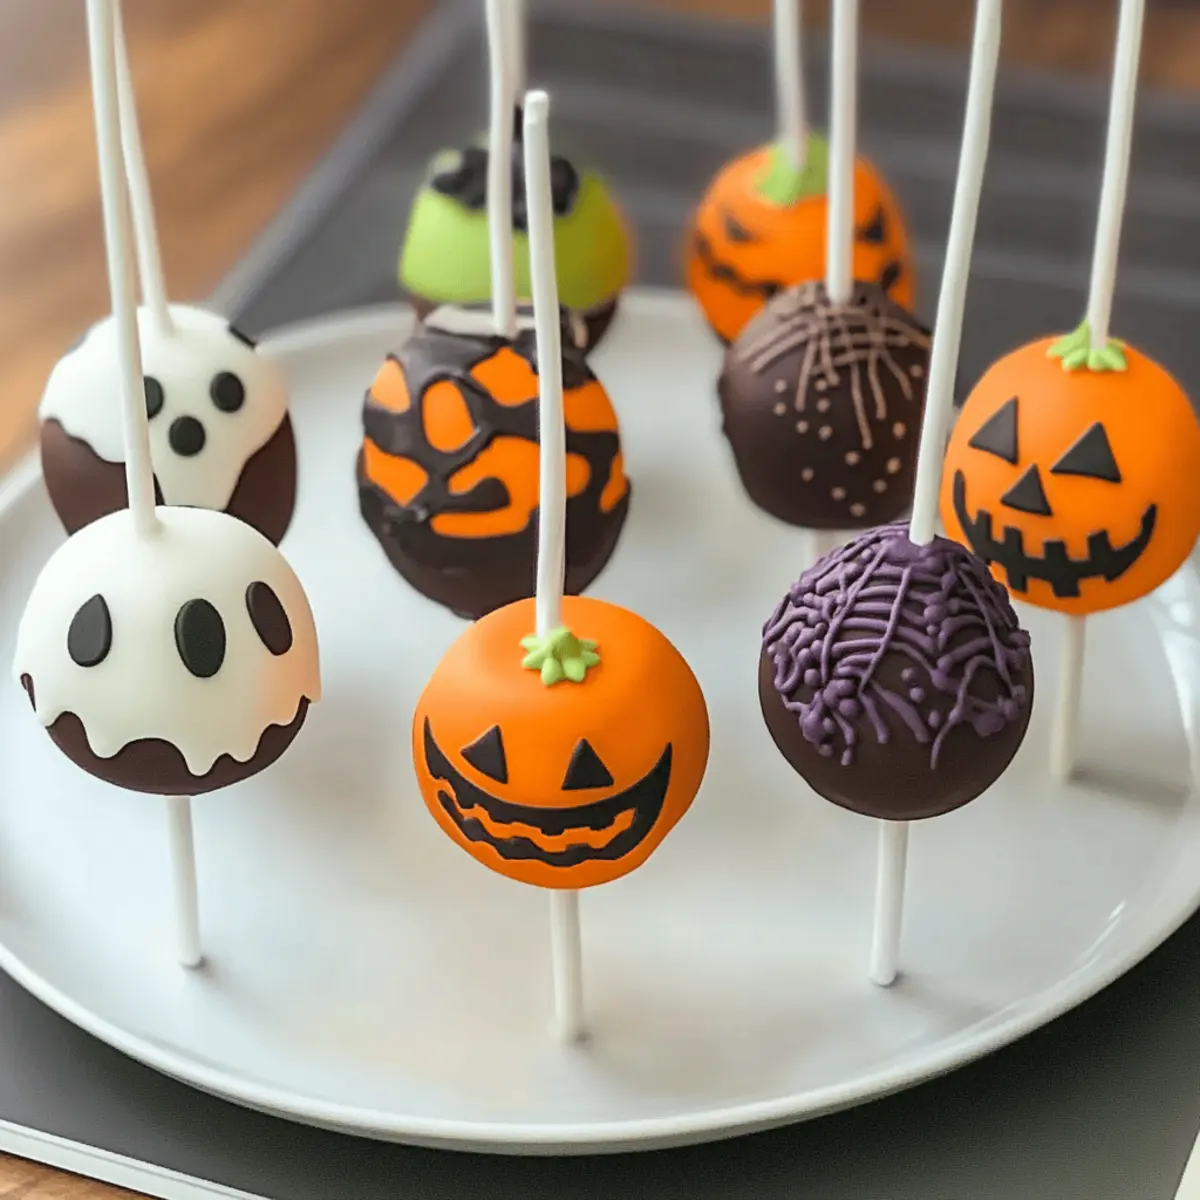
Customization Galore: The beauty of these cake pops lies in their versatility—transform them into eyeballs, ghosts, pumpkins, or even mummies!
Fun Family Activity: Gather the kids and enjoy a delightful time baking and decorating together, creating cherished memories.
Flavor Fusion: With fudgy cake and creamy frosting, every bite bursts with rich flavor, reminiscent of your favorite desserts.
Eye-Catching Treats: The vibrant colors and fun designs make these pops not just tasty but a stunning visual treat for any Halloween gathering.
Quick and Easy: With minimal prep time, you can whip up a batch in no time! Perfect for last-minute parties or lunchbox surprises.
Try pairing them with our Halloween Chocolate Chip cookies for an unforgettable Halloween dessert spread!
Halloween Cake Pops Ingredients
For the Cake
• Box Cake Mix – This is the base for your Halloween cake pops; chocolate or red velvet works wonders for a spooky vibe.
• Eggs – Essential for structure; use as per the cake mix instructions.
• Oil – Adds moisture to the cake; follow the recommendation on the box.
• Water – Required for mixing and baking the cake; keep it at room temperature for better results.
For the Frosting
• Frosting (½ to 1 cup) – Use cream cheese or chocolate frosting for a rich flavor that binds the cake crumbs nicely.
For the Coating
• Candy Melts (12 oz) – The colorful coating that makes your cake pops stand out; try using orange, black, or green for Halloween.
• Gel Food Coloring – Optional for tinting melted chocolate to match your desired design and theme.
For Assembly
• Lollipop Sticks (24) – Essential for serving, they provide the structural support your cake pops need.
For Decoration
• Candy Eyeballs – These add a fun and spooky touch; perfect for transforming your pops into creepy creatures.
• Halloween Sprinkles – Sprinkle on top for instant festive cheer!
• Colored Sugar – Use to add a bit of shimmer and charm to your treats.
• Red Gel Icing – Ideal for detailing eyeball veins or any additional spooky designs.
• Green Frosting or Fondant – Perfect for creating pumpkin stems or other themed decorations on your pops.
With these easy-to-find ingredients, your Halloween cake pops will be deliciously spooky and ready to delight family and friends!
Step‑by‑Step Instructions for Halloween Cake Pops
Step 1: Bake the Cake
Preheat your oven according to the instructions on the box cake mix. Prepare the cake mix by combining it with eggs, oil, and water as directed, then pour it into a greased cake pan. Bake for the time specified on the box, typically around 25–30 minutes, or until a toothpick inserted in the center comes out clean. Let the cake cool completely on a wire rack before moving to the next step.
Step 2: Crumble and Mix
Once the cake is cool, crumble it into fine crumbs in a large mixing bowl using your hands. Add in the frosting, starting with half a cup, and mix until it resembles a sticky dough. Ensure that your mixture is moist enough to hold together—if it seems dry, add a little more frosting. This forms the base for your Halloween cake pops, so combine thoroughly for the perfect texture!
Step 3: Roll Into Balls
Using your hands, take small portions of the mixture to shape 1-inch balls, rolling them gently. Place each ball on a lined baking sheet, ensuring they have enough space between them. Once all the balls are formed, refrigerate them for 1–2 hours or pop them in the freezer for about 30 minutes. This step helps the cake pops firm up and makes them easier to handle in the following steps.
Step 4: Insert Sticks
Melt a small amount of candy melts according to package instructions until smooth. Dip one end of a lollipop stick into the melted candy, then insert it about halfway into each cake ball. This helps the stick adhere better to the cake pop. After inserting all the sticks, return the cake pops to the refrigerator for an additional 10 minutes to allow the chocolate to set slightly.
Step 5: Dip in Chocolate
Melt the remaining candy melts in a microwave-safe bowl, stirring until smooth. Carefully dip each cake pop into the melted candy, ensuring it’s fully coated. Gently tap the stick against the edge of the bowl to remove any excess coating. This will give your Halloween cake pops a beautiful and even finish. Place them back on the lined baking sheet.
Step 6: Decorate
While the candy coating is still wet, sprinkle on your Halloween decorations like colorful sprinkles or candy eyeballs. This is where you can let your creativity shine, transforming your cake pops into ghosts, mummies, or spooky eyeballs. Make sure to work quickly, as the coating will set within minutes, sealing in your festive designs.
Step 7: Let Set
To allow your decorated Halloween cake pops to set perfectly, stand them upright in a form, like a Styrofoam block. Let them dry at room temperature for about 15-20 minutes or place them in the refrigerator for 10 minutes to accelerate the process. Ensure they are completely set before handling, making them ready for your Halloween party or family treat.

What to Serve with Halloween Cake Pops
Create a spooky celebration with delicious pairings that enchant your taste buds.
- Hot Apple Cider: A warm, spiced elixir that complements the sweetness of cake pops, evoking autumn vibes.
- Gingerbread Cookies: Add a festive touch with their warming spices that harmonize beautifully with the chocolate flavors.
- Chocolate Dipped Pretzels: The salty crunch is an amazing counterpoint to the sweet cake pops, making every bite irresistible.
- Caramel Corn: This crunchy treat adds a sweet and salty element that pairs well with the moist cake texture.
- Pumpkin Muffins: Their spice-infused goodness echoes the flavors of fall, creating a comforting, seasonal snack alongside your cake pops.
- Ghostly Cheesecake: A smooth, creamy dessert that’s rich without being overwhelming, making it a delightful follow-up to your festive treats.
- Festive Fruit Punch: Refreshing and colorful, this drink adds a vivid image to your spread while balancing the sweetness of cake pops.
- Chocolate Milkshake: Indulge in a rich shake for a fun twist that matches the excitement of Halloween-themed desserts.
- Miniature Cupcakes: Serve an array of festive flavors that can complement the decorative delight of your Halloween cake pops.
Halloween Cake Pops Variations & Substitutions
Feel free to unleash your creativity and customize these delightful cake pops to match your style and taste!
-
Homemade Cake: Swap the boxed mix for a homemade cake. It adds a personal touch and elevates the flavor.
-
Different Flavors: Experiment with unique cake flavors like spice cake or carrot cake, bringing a delightful twist to this classic dessert.
-
Vegan Options: Use a dairy-free cake mix and substitute eggs with applesauce or flaxseed meal for a vegan-friendly version.
-
Flavorful Frostings: Choose from different frosting flavors like cream cheese, vanilla, or even peanut butter for a rich taste that complements your cake base.
-
Decorative Themes: Opt for a Halloween theme or create pops for other occasions by changing the color of the candy melts and decorations. Think Easter eggs or festive holiday designs!
-
Texture Variety: Add crushed nuts or cookie crumbs to the coating for an exciting crunch. It adds an unexpected yet delightful texture to each bite.
-
Cut the Heat: If you want to spice things up, infuse some cinnamon or nutmeg into your cake mix for a cozy autumn flavor, perfect for the season.
For an added sweet treat, try pairing these pops with our Apple Crumb Cake with Cinnamon Apple Drizzle or our fun White Chocolate Halloween creations! Let your imagination run wild as you create an unforgettable dessert spread that will wow your family and friends.
How to Store and Freeze Halloween Cake Pops
Room Temperature: Store your Halloween cake pops in a cool, dry place for up to 3 days. Use an airtight container to keep them fresh and prevent them from drying out.
Fridge: For longer freshness, refrigerate the cake pops for up to 1 week. Just ensure they’re in a sealed container to avoid absorbing odors from the fridge.
Freezer: If you want to save some for later, freeze the cake pops in a single layer on a baking sheet until solid, then transfer them to an airtight container. They’ll stay good for up to 2 months.
Reheating: When ready to enjoy, thaw in the fridge overnight or let them sit at room temperature for a couple of hours. Avoid microwaving, as it can compromise the texture of your Halloween cake pops.
Make Ahead Options
These Halloween Cake Pops are a fantastic choice for busy home cooks looking to save time and streamline their baking for the season! You can prepare the cake mixture and roll it into balls up to 3 days in advance, storing them in the refrigerator in an airtight container to maintain their moisture and flavor. Just remember to chill them for about 1-2 hours or freeze for 30 minutes after rolling before inserting the lollipop sticks. When it’s time to serve, simply dip the cake pops in melted candy melts, decorate with festive sprinkles, and let them set. This approach ensures that your Halloween Cake Pops are just as delicious and delightful when the time comes to wow your guests!
Tips for the Best Halloween Cake Pops
-
Choose the Right Mix: Use chocolate or red velvet cake mix to reinforce that Halloween vibe. It complements festive designs beautifully!
-
Bind Carefully: Add just enough frosting to the cake crumbs to create a sticky mixture. Overdoing it can make your cake pops too wet, affecting their shape.
-
Chill the Balls: Don’t skip the refrigeration step! Chilling the cake balls before inserting the sticks helps them hold their shape and makes dipping easier.
-
Work Quickly: When dipping in chocolate, be swift! The candy melts can set quickly, so ensure your decorations are added while the coating is still wet.
-
Have Fun with Decor: Embrace creativity! Whether it’s candy eyeballs or festive sprinkles, remember that the joy of making Halloween cake pops is in the artistic designs.
-
Store Properly: Keep your Halloween cake pops in a cool, dry place or refrigerate them if it’s warm outside. Enjoy them within a week for the freshest taste!

Halloween Cake Pops Recipe FAQs
What kind of cake mix should I use for Halloween cake pops?
Absolutely! You can use any flavor of box cake mix, but chocolate or red velvet provides a festive Halloween flair. Both flavors complement the spooky designs beautifully and enhance the overall taste of the pops, making them even more delightful!
How should I store Halloween cake pops?
After you’ve made your delicious Halloween cake pops, store them in a cool, dry place at room temperature for up to 3 days. For longer storage, refrigerate them in an airtight container where they can stay fresh for up to a week. This way, they remain moist and yummy for your celebrations!
Can I freeze Halloween cake pops?
Yes, you can! To freeze your Halloween cake pops, place them in a single layer on a baking sheet and freeze until firm. This typically takes about 1-2 hours. Once solid, transfer them to an airtight container or freezer bag. They can be stored for up to 2 months! Just remember to thaw them in the fridge overnight before enjoying.
What if my cake pop mixture is too dry?
Very! If your cake pop mixture seems a bit dry, don’t fret! Simply add a little more frosting, a tablespoon at a time, until it reaches a sticky dough-like consistency. This will help them hold their shape while ensuring they pack that delicious fudgy flavor you love.
Are there any dietary considerations for Halloween cake pops?
Absolutely! If you’re catering to dietary needs, consider using gluten-free cake mix. There are also vegan frosting alternatives available if you’re looking to make an egg-free version. Always check ingredient labels for potential allergens, especially for guests with nut or dairy allergies!
How can I make cake pops suitable for pets?
Very! While we love our cake pops, they are not pet-friendly. Ingredients like chocolate and certain frostings can be harmful to dogs and cats. If you want to include your furry friends in the Halloween fun, consider making “pupcakes” using dog-safe ingredients like pumpkin and peanut butter instead!
Halloween Cake Pops: Spooky Treats Your Family Will Love
Ingredients
Equipment
Method
- Preheat oven and bake the cake as per box instructions.
- Crumble the cooled cake and mix with frosting until sticky dough forms.
- Roll the mixture into 1-inch balls and refrigerate to firm up.
- Melt candy melts, dip one end of lollipop sticks, and insert into cake balls.
- Dip each cake pop in melted candy melts until fully coated.
- Decorate while coating is wet with sprinkles and other decorations.
- Let cake pops set in a styrofoam block to dry.
Leave a Reply